↧
Photo of the Month - January 2014
↧
Looking Forward, Looking Back
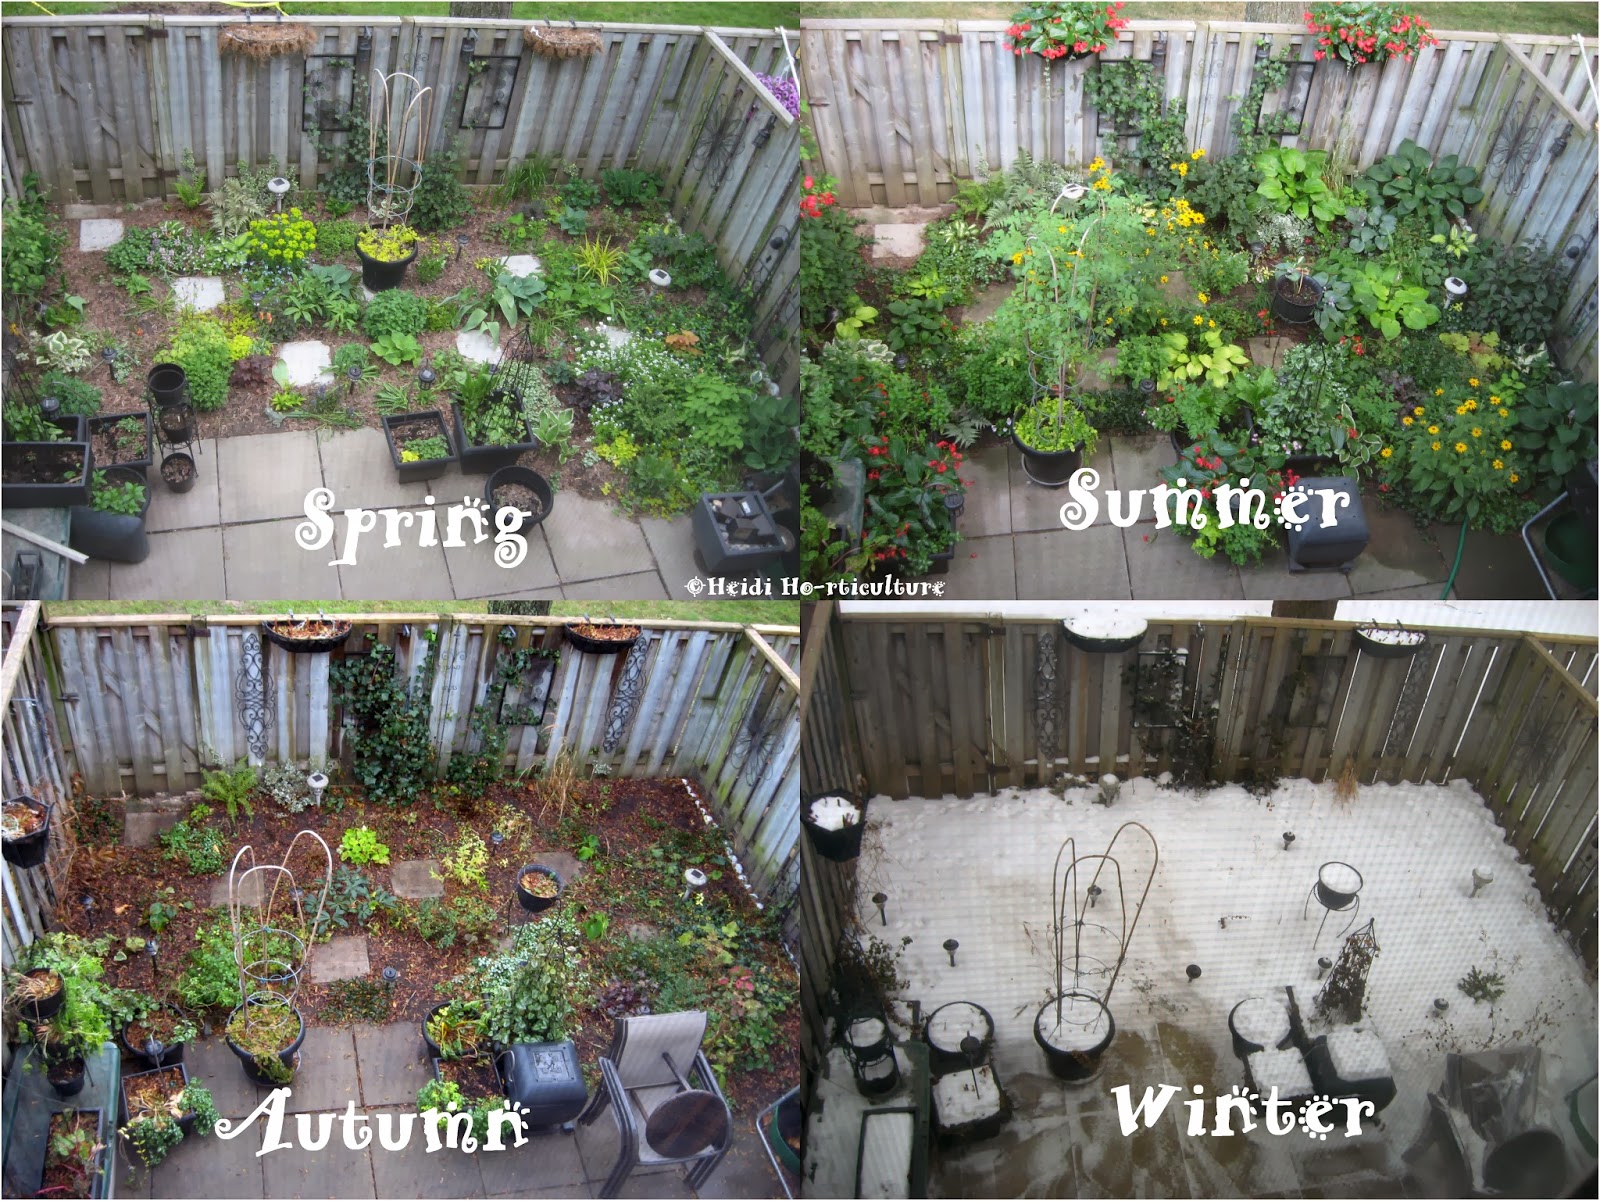
Even though this winter has been harsh, I am grateful for it. Looking back, I see the beauty in seasonal change. Winter's bleakness brings forth renewal come spring. Looking at these photos in succession really help to balance the change and the need for the seasons. For without the winter, spring would never reveal such beauty and vibrant colour! It helps me cope with the upcoming forecasted 10cm snow fall we are expecting in the next few days. Ugh!
Yet, the few degrees milder weather today, makes me anxious to get my garden plans ready for spring. In the autumn I planted several shades of Crocus chrysanthus, or known as Snow Crocus (early flowering variety). I can hardly wait to see how they'll bloom in spring. Given this harsh winter, I hope they will fair alright.
Ok, start planning...what to do next spring....
↧
↧
Photo of the Month: February 2014 Happy Valentine's!
↧
Peace Lily (Spathiphyllum) Brown Tips
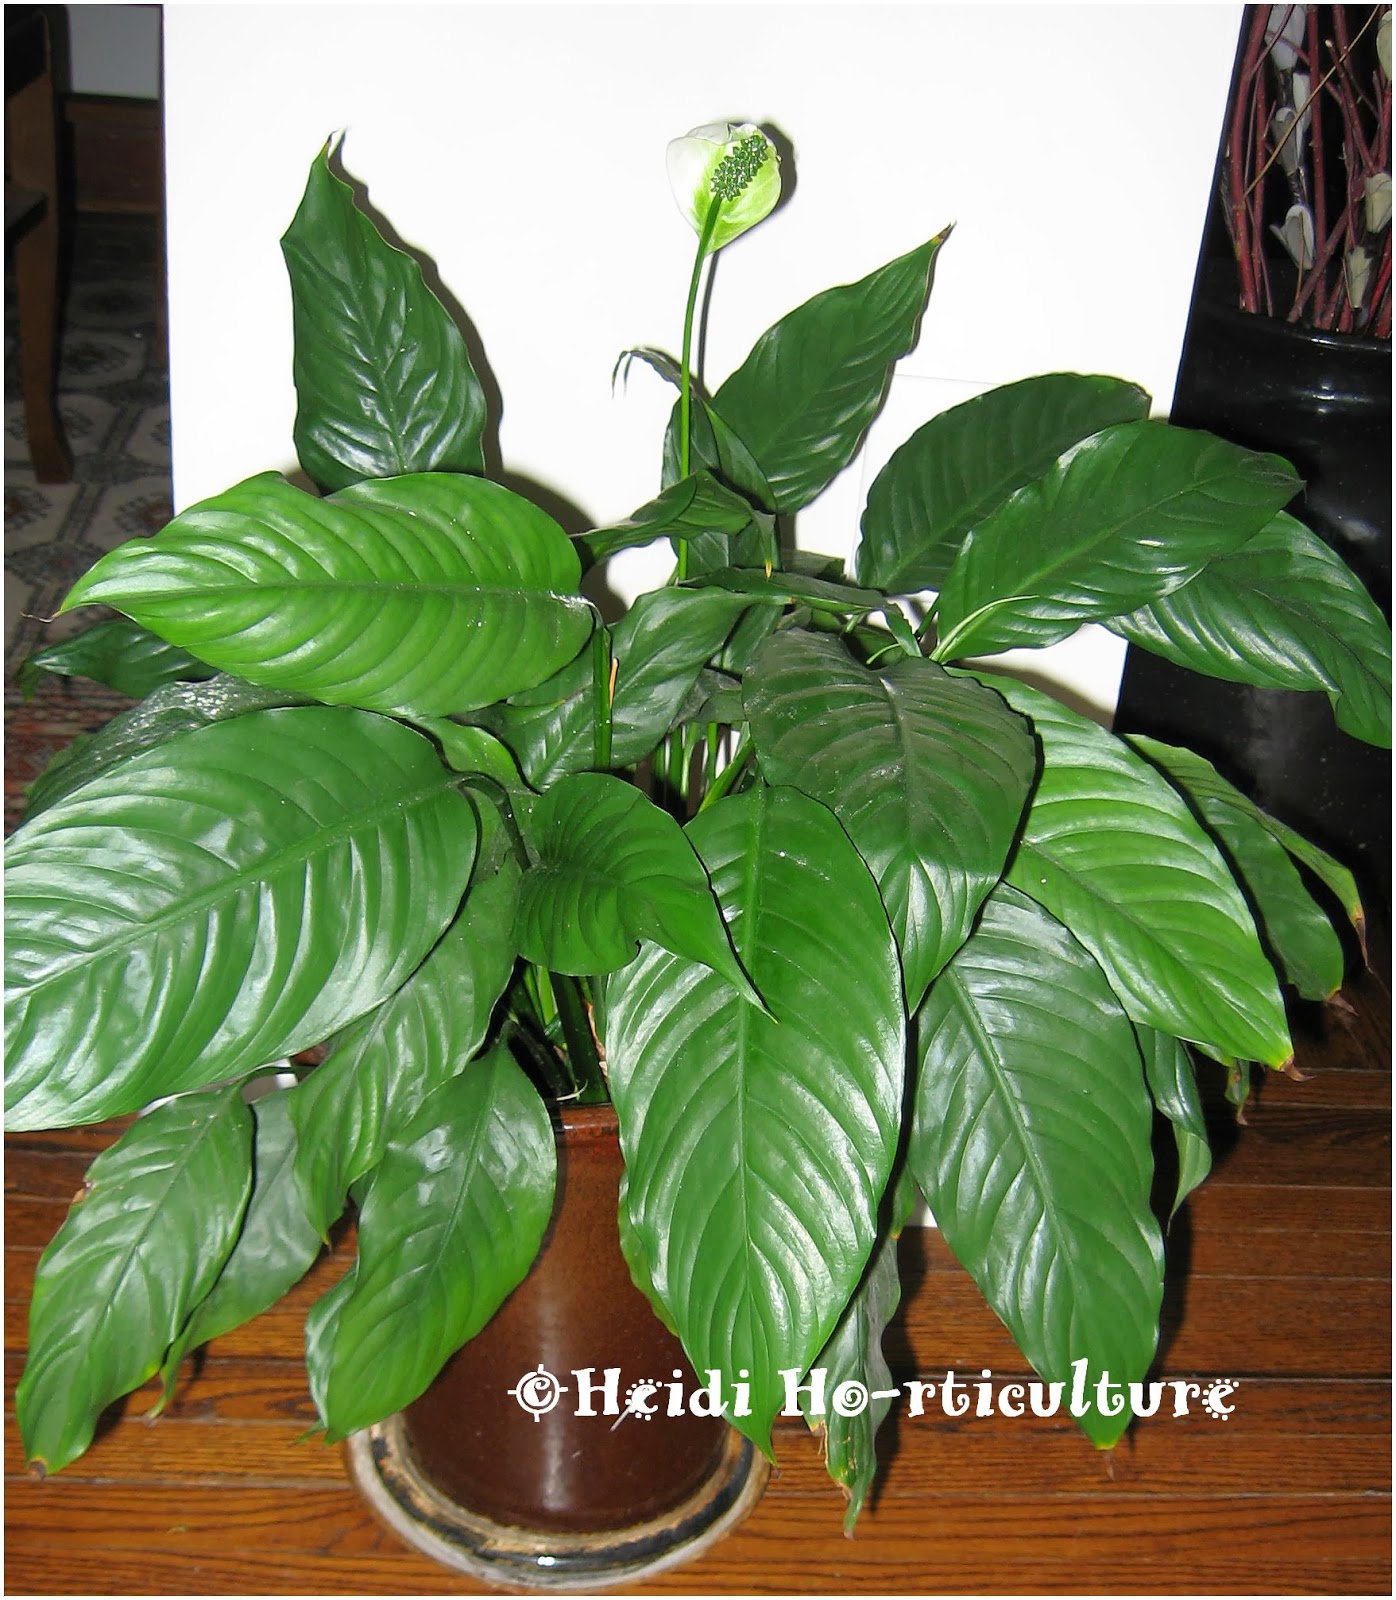
There are about 40 species in the genus of the Peace Lily Plant (botanically, Spathiphyllum). It's a fantastic house plant for low light or indirect light situations.
However they can be temperamental and finicky when the seasons change.
These browning tips can be caused by several factors:
1). overwatering
2). root bound - too small of pot
3). chlorine in water
4). lack of humidity
Lack of humidity and chlorine I suspect are the culprits here. Since I moved, this plant has suffered every winter. I let it dry out between watering and water making sure that I don't overly soak the pot.
Because I have forced air for heat, I try and relocate it during the colder months to avoid this from happening. I've even tried grouping it with other plants to create a more humid spot, but with forced air in the room fed by two heat vents, it's hard to maintain adequate humidity in the room.
On closer inspection, I've noticed water marks on the leaves from watering.
Hard minerals and chlorine in tap water is quite harsh on plants. Most house plants grow in soil-less mixtures and with the added loss of humidity, tap water can be tough on plant roots. From now on, I will use tap water that has sit for several days. Allowing the chlorine to dissipate. As for the hard minerals, I may use the water from my dehumidifier to see if it's any better for my plants.
For now, I have cut back any leaves that are browning. Any stems that have begun to have spots.
I filled boiled water in an atomizer and have sprayed this plant to help encourage new growth and to help it bounce back.
Spring is only a month away. Hopefully, my Peace Lily will flourish again and provide great flowering all year long!
However they can be temperamental and finicky when the seasons change.
 |
| Here, not only are the tips of the leaves turning brown... |
 |
| Entire edges of some leaves are turning brown and papery thin. |
1). overwatering
2). root bound - too small of pot
3). chlorine in water
4). lack of humidity
Lack of humidity and chlorine I suspect are the culprits here. Since I moved, this plant has suffered every winter. I let it dry out between watering and water making sure that I don't overly soak the pot.
Because I have forced air for heat, I try and relocate it during the colder months to avoid this from happening. I've even tried grouping it with other plants to create a more humid spot, but with forced air in the room fed by two heat vents, it's hard to maintain adequate humidity in the room.
On closer inspection, I've noticed water marks on the leaves from watering.
 | |
| My hard tap water is leaving marks as the water droplets dry. |
Hard minerals and chlorine in tap water is quite harsh on plants. Most house plants grow in soil-less mixtures and with the added loss of humidity, tap water can be tough on plant roots. From now on, I will use tap water that has sit for several days. Allowing the chlorine to dissipate. As for the hard minerals, I may use the water from my dehumidifier to see if it's any better for my plants.
For now, I have cut back any leaves that are browning. Any stems that have begun to have spots.
I filled boiled water in an atomizer and have sprayed this plant to help encourage new growth and to help it bounce back.
Spring is only a month away. Hopefully, my Peace Lily will flourish again and provide great flowering all year long!
↧
Hoya or Waxplant
Hoya carnosa or commonly known as Waxplant, is a common trailing houseplant for bright areas indoors.
I can honestly say, these are some of the most glorious flowers to look at up close. Even in their clusters, they dumfound you - when you least expect this common houseplant to produce anything, all of a sudden clusters of wonderful flowers begin to unfurl.
From clustered buds...
This Hoya enjoys a south-west window exposure. Not overly root bound, yet quite firmly established. Since this February, fertilizer has been added every watering. Flowering duration: February - April and sporadic flowers throughout the year.
The most attractive and wonderful feature to me: its flowers.
I can honestly say, these are some of the most glorious flowers to look at up close. Even in their clusters, they dumfound you - when you least expect this common houseplant to produce anything, all of a sudden clusters of wonderful flowers begin to unfurl.
From clustered buds...
 |
| ...to starbursts... |
... to unfolding little stars - they are delightful to me.
 |
| Depending on its exposure and watering, flowering can last up to a month or two. |
Take a closer look at these waxy flower buds:
 |
| Beautiful as they are, they hold inside another design marvel... |
 |
| Through 5 segmented star shaped, pubescent flaps, they urfurl to reveal another waxy star shape within. No bigger than a nickel coin, they are so beautiful and delicate. |
 |
| Try growing one for yourself in the house! |
↧
↧
Outdoor Winter Urn in March
Well, it's finally March. Yet, it certainly doesn't feel like it.
For those skeptics out there, I just wanted to prove that winter urn designs, made with evergreen boughs and accents can endure the winter and look half decent. These are mine out front. Made early last December, they still look alright.
Problem now: it looks too 'Christmasy' and festive for this time of year. What to do?!
This is where accents can be removed and where others can be inserted. However, when the weather is still -10 degrees or more out there, you can run into difficulty switching items.
Two options to remove:
1.) Cut the accents out
2.) Bring the container indoors to warm up over a day or two or pour boiling water around the accents and wiggle till they pop out.
Another option: never add accents in the first place that are overly festive. Accents like fruit, vine balls and neutral coloured items have far more longevity in their wear and use beyond Christmas than just red, silver and gold accents.
I got these berry stems and pussy willow accents at the dollar store. Adding these and removing the red ornaments is all I need to do to add a touch of spring likeness. Once the soil thaws and heavy deep freezing weather pass, I'll be making official spring urns. But until then - I think this is sufficient to carry me through.
Oh, if only the snow were melted and the day-time temperature was marginally higher. ;)
For those skeptics out there, I just wanted to prove that winter urn designs, made with evergreen boughs and accents can endure the winter and look half decent. These are mine out front. Made early last December, they still look alright.
 |
| This one has signs of winter sun burn on the cedar boughs, but apart from that... no needle casts = success! |
This is where accents can be removed and where others can be inserted. However, when the weather is still -10 degrees or more out there, you can run into difficulty switching items.
Two options to remove:
1.) Cut the accents out
2.) Bring the container indoors to warm up over a day or two or pour boiling water around the accents and wiggle till they pop out.
Another option: never add accents in the first place that are overly festive. Accents like fruit, vine balls and neutral coloured items have far more longevity in their wear and use beyond Christmas than just red, silver and gold accents.
 |
| I usually do this switch over of accents after Valentine's Day, given red still fits the season for February. Although, we had another blast of winter and my urns were covered with snow. |
 |
| What 3 months of winter wear looks like. |
↧
Tough Winter on Euonymus - Burned Leaves
This winter has been exceptionally tough on Euonymus foliage. I haven't seen a variety that was unscathed. Not to worry, winter burn and brown leaves will not be left on the shrubs for long.
Euonymus scale quite prevalent in the GTA and I believe it's because of our more recent, gentle winters. Scale insects nestle in and fixate tightly on remaining interior foliage and stems over winter and don't die off in large numbers due to protected warmer winter months. Now, I smile in gratitude - for more of these insects will have died off this winter, because of the harsher conditions.
Once the leaves fall off the bush, examine the leaves on their underside. If you see white, flaky residue, it may be scale. Rake as many of the leaves as you can from beneath. It's likely they (not all do) have some overwintering eggs of Euonymus scale insects. Do NOT compost. Remove the leaves from your garden. Add compost or some triple mix to the soil below and be sure to water the plants if we have a dry spring. I caution adding synthetic fertilizers at this point, since scale insects favour stressed plants and love added nutrients. There are only so many healthy leaves to go around. You don't want scale to over-power the plant. For control of this insect, check out my post on Euonymus Scale.
 |
| Sections of this Euonymus, trained as a climber, has burned foliage dotted about. |
Euonymus scale quite prevalent in the GTA and I believe it's because of our more recent, gentle winters. Scale insects nestle in and fixate tightly on remaining interior foliage and stems over winter and don't die off in large numbers due to protected warmer winter months. Now, I smile in gratitude - for more of these insects will have died off this winter, because of the harsher conditions.
 |
| This is Coloratus Euonymus - the ground cover variety. Even with adequate snow coverage, it too has signs of winter burn. |
 |
| If Euonymus is grown as a climber and there's very little growth beneath, simply shake off dead foliage. If it is stubborn to fall off, then prune back to older buds. |
 |
| Here, you can see healthy buds remain. Not to worry. They will refoliate the plant. |
↧
Photo Of The Month - March 2014
↧
Dwarf Alberta Spruce Winter Damage
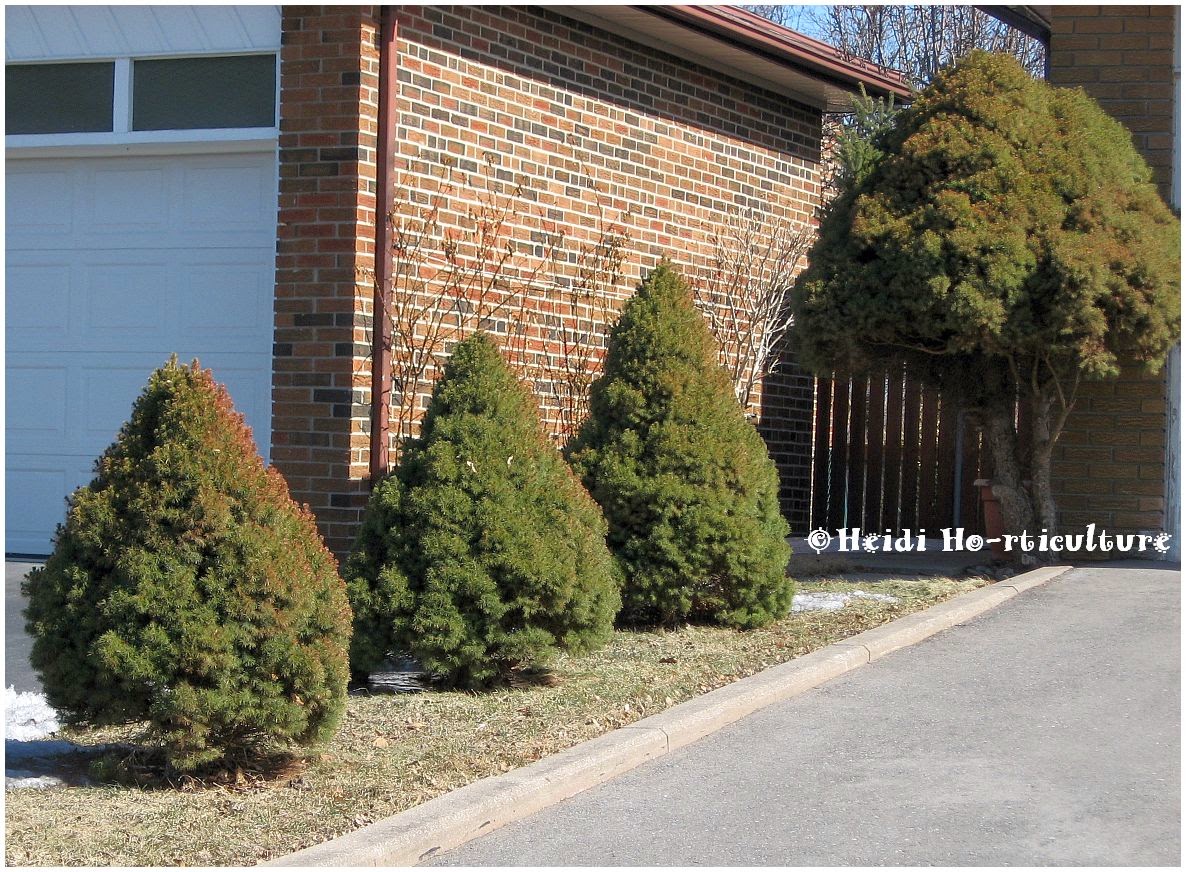
Spring daylight, the intense sunshine and cold nights are showing side effects on some evergreens. I am saddened by winter-burn damage on Dwarf Alberta Spruce (Picea glauca conica). With the sun's rays bouncing off of snow too and below freezing temps at night, I'm afraid most of these conifers are burned on the sunniest side of exposure.
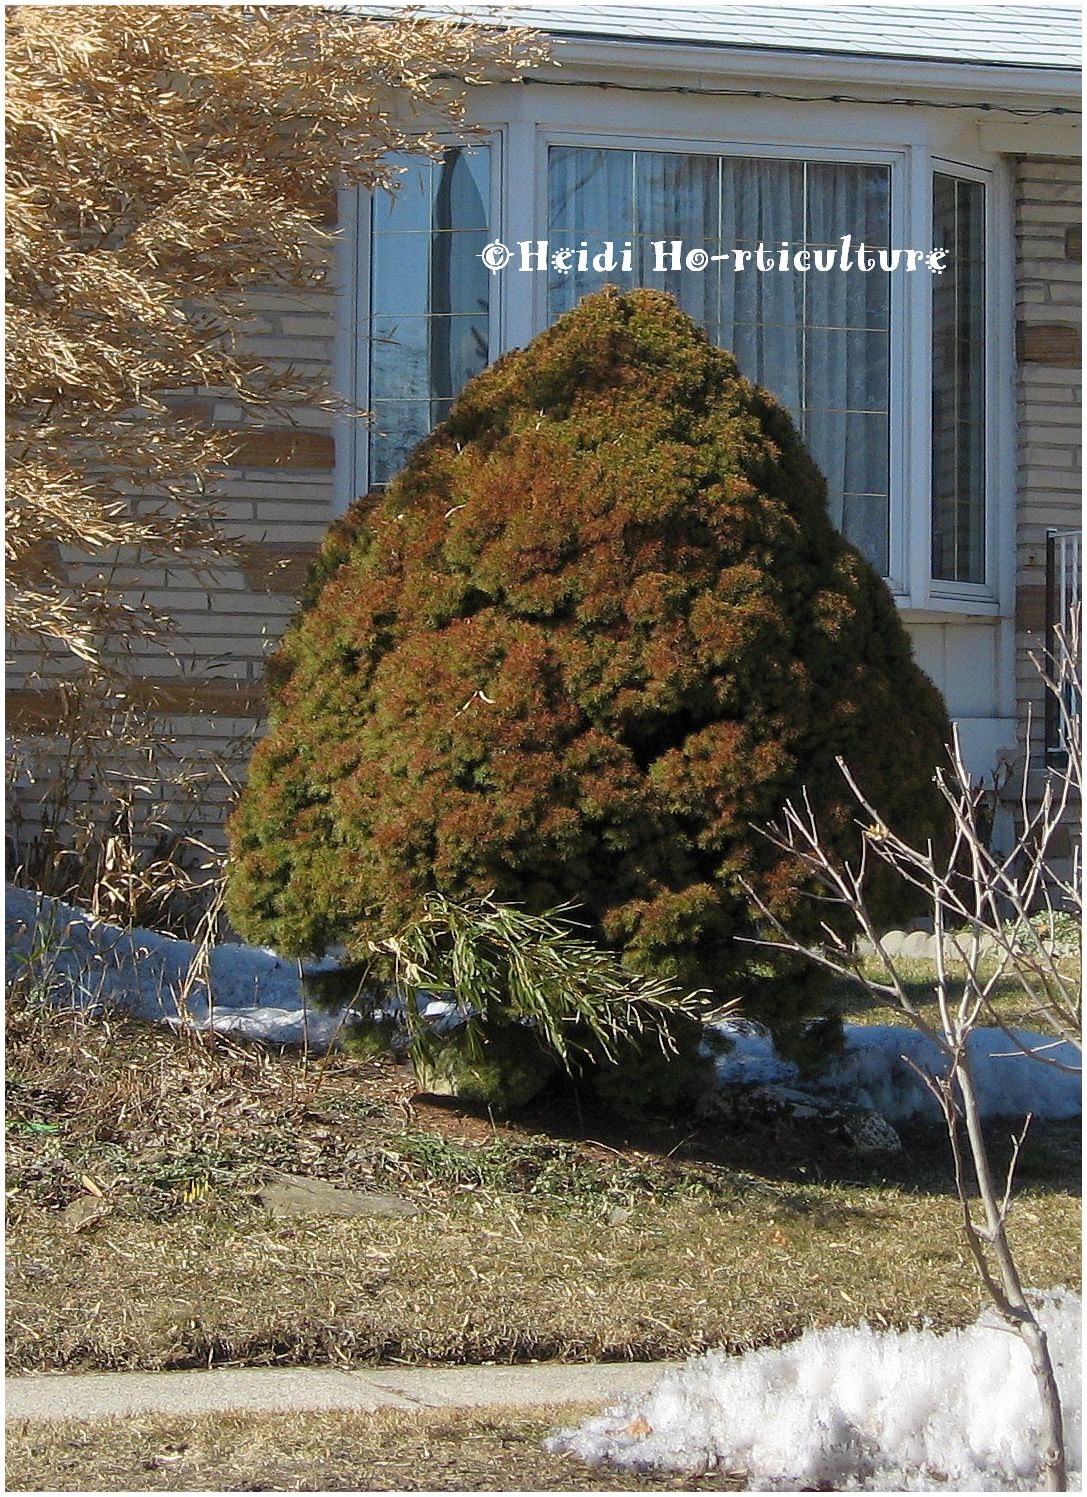 |
| This is especially true for the south facing specimens shown here. |
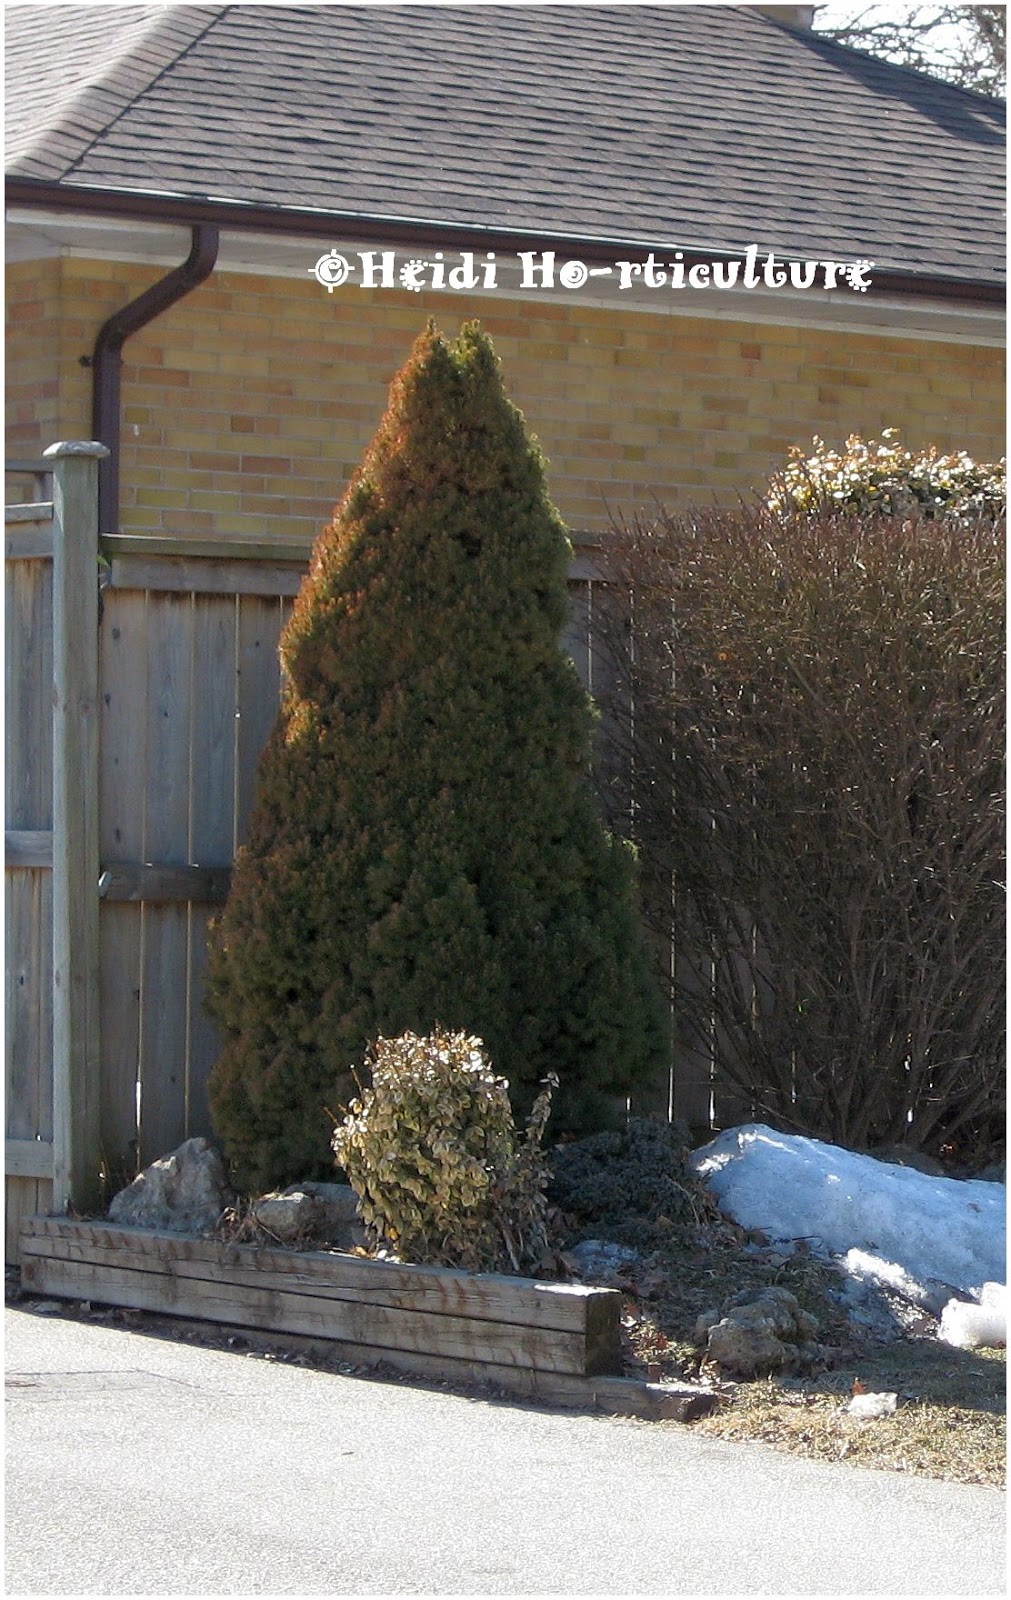 |
| No matter the size, and situation, all have been burned. |
 |
| Given some are situated nearest driveways, paved paths or the house, I'm afraid some will bear the burned needles for some time. |
If the buds are unfortunately brown and dry to touch, well, I'm afraid the plant will not easily return to former health and shape.You may try to douse the Dwarf Alberta Spruce with heavy spray of water to loosen any needles and water the base to help it regain new bud growth. If we have a dry spring, this is crucial. You may lose the little conifer otherwise.
I sure hope that some of the largest sizes I saw today will bounce back. It's a shame to see these older specimens die.
How to avoid this: Prevention is key.
 | |
| If your garden faces south, please wrap your plant in late November, early December. I'm not a fan of burlap, but if it saves your Dwarf Alberta Spruce from burning, it's better than nothing. |
- plant in more sheltered locations
- plant away from paths and driveways
- erect a screen or something to defuse the sun from shining directly on the plant over winter
- heap snow under the plant before it all melts, to help retain soil moisture
- plant alternatives
Here is a great alternative to the common, unsightly look of burlap: From NuVue Products - Lawn And Garden
 |
| Photo and Product from NuVue Soft Plant Covers |
 |
| Photo and Product from NuVue Frame Plant Covers |
↧
↧
Collecting Juniper Berries
Spring may sound like an odd time to harvest Juniper Berries, but in my experience, it's the best time. I have fond memories collecting Juniper berries with my father (just not the itchy arm part). Dad was a butcher by trade and avid cook of wild game. Juniper berries were used in ragouts, goulash and some hardy sauces.
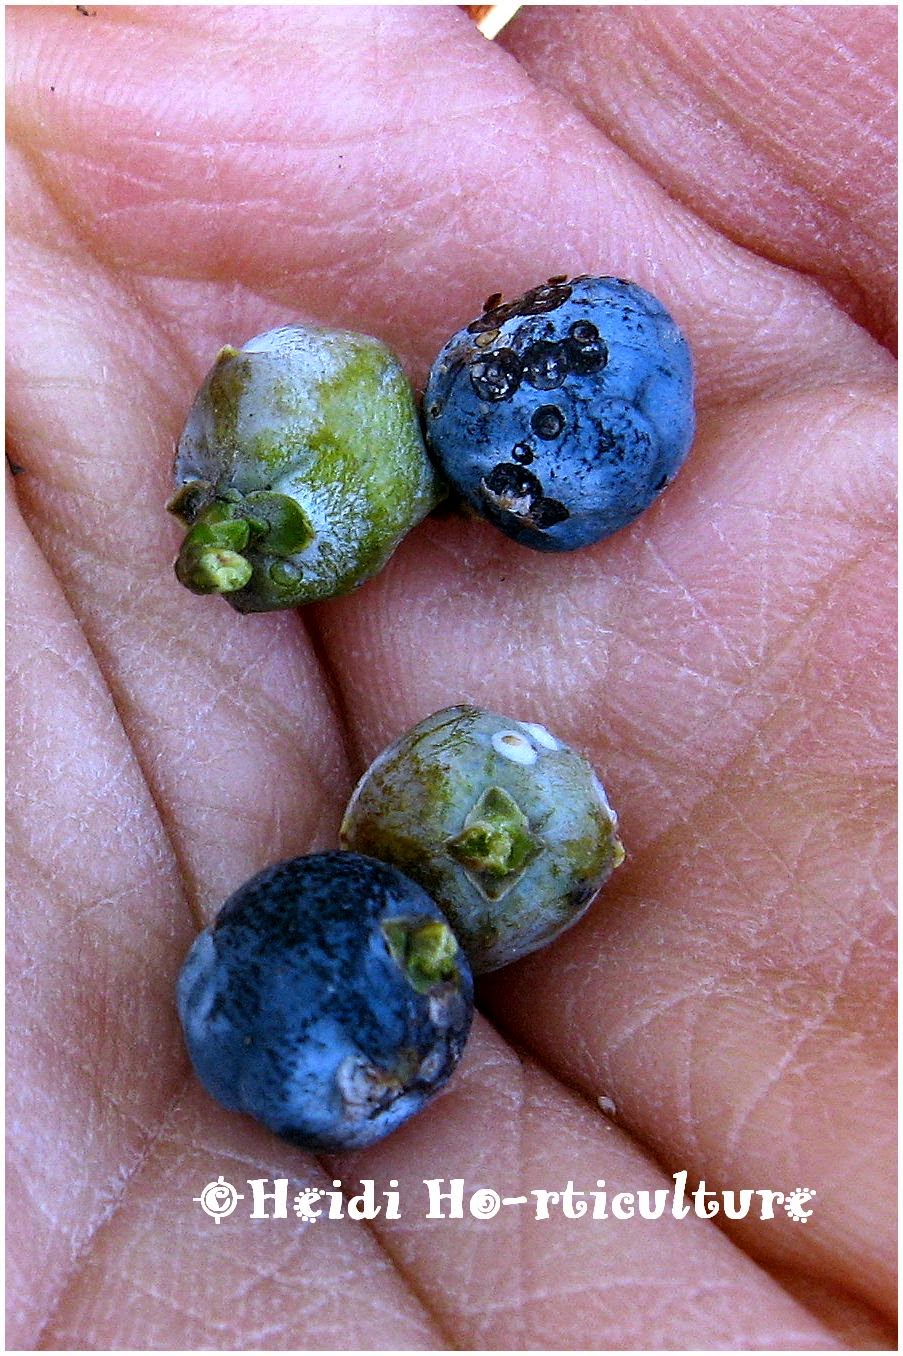
It takes two to three years for the berries to become blue. Don't be tempted to pick last year's berries in autumn when they start to get reddish/blue. Dad said juniper berries should be left on the evergreen overwinter. They have a more distinctive flavour, as apposed to collecting them in autumn. Perhaps the freezing temperatures have something to do with that. I'm not sure.
Juniperus virginiana is a sizable variety of Juniper. Standing sometimes 30 ft or higher. It has a more airy habit and very long branch network. Like all Junipers, it's evergreen foliage is quite prickly and can give off a rash when branches come in contact with bare skin. Usually, the berries are found within two feet of the branch tips. Quite easy to gather. You can also collect berries (actually cones) from Juniperus horizontalis cultivars. Especially native ones; in woodlands throughout cottage country. Their berries are smaller and yields may vary due to conditions, but they too are good for culinary uses.
 |
| When collecting, it's the darker, blue purple berries that you want. |
 |
| These are last summer's fruit. You want 2 to 3 year old berries. They may be harder to find, yet these green/grey ones haven't ripened enough. They will be bitter and hard. |
 |
| Best to leave these for next year's harvest. |
 |
| Here you can see the difference up close. Rubbing them slightly before you pick them off the bush/tree, you'll see under the white coating their true colour. The darker, the better. |
Juniperus virginiana is a sizable variety of Juniper. Standing sometimes 30 ft or higher. It has a more airy habit and very long branch network. Like all Junipers, it's evergreen foliage is quite prickly and can give off a rash when branches come in contact with bare skin. Usually, the berries are found within two feet of the branch tips. Quite easy to gather. You can also collect berries (actually cones) from Juniperus horizontalis cultivars. Especially native ones; in woodlands throughout cottage country. Their berries are smaller and yields may vary due to conditions, but they too are good for culinary uses.
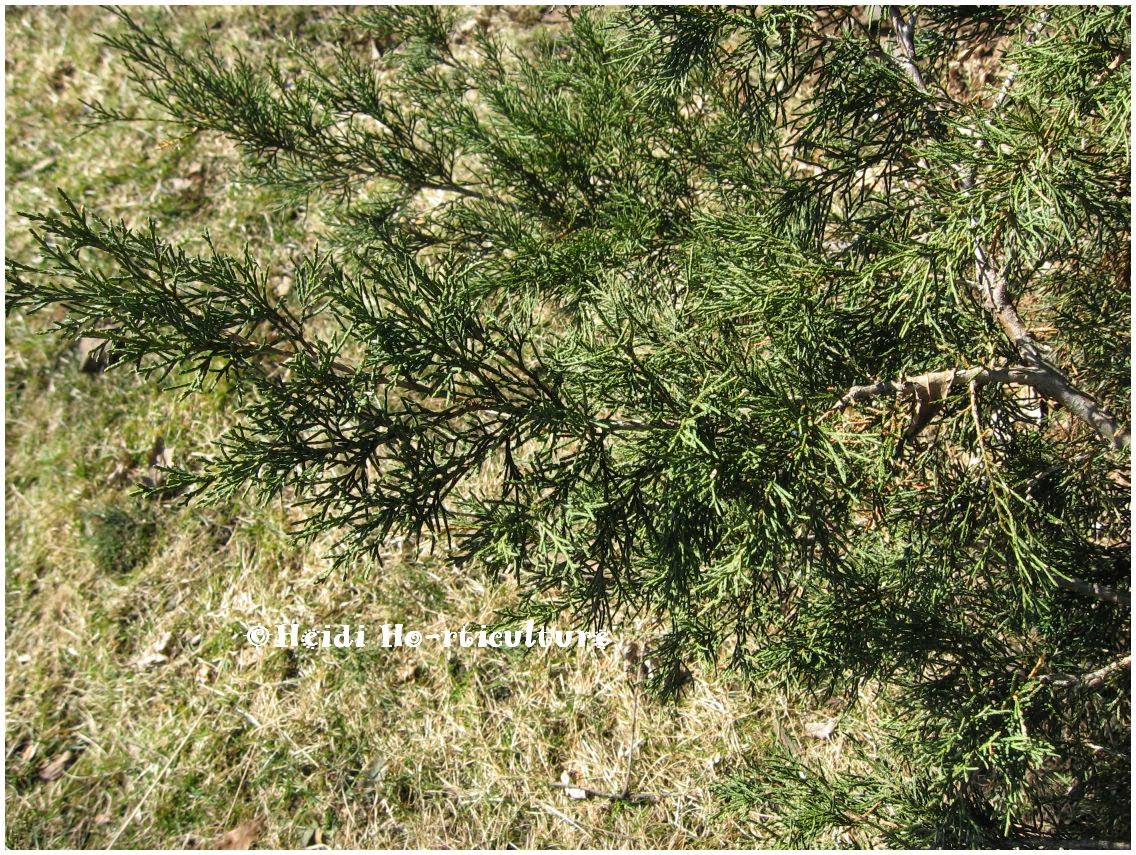 |
| Better to wear long sleeved shirts/jackets when handling the branches, just in case. |
↧
Premature Spring Clean Up - Frost Protection
It happens every spring. A week or two of warm weather and out come the rakes and the pruners to tidy up the garden. Some tidy so well, as though annual planting season is upon us already. But, watch out - the unpredictable weather can reek havoc and cause some damage to tender shoots emerging from the soil.
Plants not to worry about so much: Scilla, Tulips, Daffodils, Hyacinths, Snowdrops, Crocus....spring bulbs are quite resilient to frosts and unexpected freeze ups.
In my opinion, it's best to leave leaf litter and some of the major clean up for the end of April. Better to play it safe, than sorry.
What to do if your garden is all tidy and you have tender plant material that needs protection?
Given we are experiencing a late spring, the most worrisome plants are tender perennial shots that have emerged close to brick walls or on south facing corners of the garden. These areas often warm up much faster than other areas of the garden and cool down quickly in frosty weather.
If your garden is in an exposed area, cover plants with newspapers, old towels, garden cloths, old bed sheets or put back all those leaves you bundled in bags and bins for refuse pick-up. Secure cloth, or newspapers with rocks or stakes. You can even use light tarping. Just be forewarned, heavy duty tarps can flap about causing more damage to young shoots - better to use light materials to cover up.
Lee Valley has a whole Climate Control selection of materials which can aid in frost protection. Here is an example:
On the upside, our brief cold snap has been accompanied with precipitation. This is a good thing. Snow and rain protect the tender growth. Cold air and frost however are the culprits and damage plants.
From your household: you can use large bowls, large pop bottles and empty milk cartons with their tops removed. These are great ways to individually protect certain plants, instead of draping the entire garden with bed sheets..etc.
Be creative. Just don't do more damage to the plants than what a little frost may do.
 |
| Bulbs like these Narcissus and... |
 | ||
| these Scilla are quite tough and don't need frost protection. |
 |
| Even when fully in bloom, Crocus close their flower petals overnight and are resilient to frost. |
What to do if your garden is all tidy and you have tender plant material that needs protection?
 |
| When you have perennials like this Sedum,... |
 |
| ...Aquilegia or... |
 |
| ...Brunnera, which have flushed a fair bit of new tender growth already, you may want to cover them overnight. |
If your garden is in an exposed area, cover plants with newspapers, old towels, garden cloths, old bed sheets or put back all those leaves you bundled in bags and bins for refuse pick-up. Secure cloth, or newspapers with rocks or stakes. You can even use light tarping. Just be forewarned, heavy duty tarps can flap about causing more damage to young shoots - better to use light materials to cover up.
Lee Valley has a whole Climate Control selection of materials which can aid in frost protection. Here is an example:
 |
| Frost Blanket from Lee Valley. |
From your household: you can use large bowls, large pop bottles and empty milk cartons with their tops removed. These are great ways to individually protect certain plants, instead of draping the entire garden with bed sheets..etc.
Be creative. Just don't do more damage to the plants than what a little frost may do.
↧
Amaryllis Blooming in Spring - Happy Easter!
I experimented with my Amaryllis this winter. As always, I re-potted it last November, whilst it was dormant.
It leafed up, and flowered beautifully right around the Christmas season, but this time I did something different.
I let it be.
I lost two leaves in January, but two stayed green and grew quite in length without wilting and dying back. I left them, while they weigh heavily down and then propped them up by a window. Each watering, I added water soluble 7 7 7 fertilizer and let it dry between feedings. The bulb grew large, so I kept the leaves to give the bulb energy.
You can see the two longer leaves to the left are the originals from December. Three newer leaves were emerging last week when I had a hunch it was to re-bloom.
The bulb became large. Wanting to up-size the pot a bit, the bulb wouldn't budge without some force, which would either damage the leaves or the roots. So I left it.
Yay!
It leafed up, and flowered beautifully right around the Christmas season, but this time I did something different.
I let it be.
I lost two leaves in January, but two stayed green and grew quite in length without wilting and dying back. I left them, while they weigh heavily down and then propped them up by a window. Each watering, I added water soluble 7 7 7 fertilizer and let it dry between feedings. The bulb grew large, so I kept the leaves to give the bulb energy.
 |
| Lo'and behold, this is the result. New leaves and a flower bud...emerging in late March. |
The bulb became large. Wanting to up-size the pot a bit, the bulb wouldn't budge without some force, which would either damage the leaves or the roots. So I left it.
Yay!
 |
| I decided to remove last year's leaves and allow the plant to straighten. |
 |
| I gather since it's spring, I have less light coming through the window, making the leaves and flower stalk stretched quite a bit. |
↧
Removing Lily Flower Anthers To Lengthen Bloom Time
There are two main reasons to remove the pollen covered parts from a Lily flower.
Removing the small bean like anthers before they are covered in pollen will:
1.) prevent getting pollen everywhere which can stain both inside the flower and cloth.
2.) lengthen the bloom time of the flower.
Removing the pollen source will inhibit pollination and will lengthen flowering duration.
Lily flowers have various structural parts. Petals, which give the trumpet flower shape and encase inside male and female parts. It's important to know the difference.
Male: 6 stamens (thin filaments) and anthers which carry the pollen.
Female: The long stigma, style and ovary.
Once pollinated, an embryonic seed will develop at the base of the flower.
The trick to doing this is to remove the anthers at the end of long filaments inside the flower before they release the yellow powdery pollen.
Don't worry, if the anthers bobble about and are full of pollen, it's a bit late but still doable.
Carefully wrap your fingers around the anthers, making sure you protect the stigma below and tease away gently before pollen is dispersed. The trick is not to get any on the sticky stigma.
Do this as well with amaryllis and any other lily. Most florists and garden centres do this for you, but if you buy potted plants or cut flowers which are in bud, it'll be up to you to achieve a lengthier bloom time with this trick once the flowers open.
Have a go!
Removing the small bean like anthers before they are covered in pollen will:
1.) prevent getting pollen everywhere which can stain both inside the flower and cloth.
2.) lengthen the bloom time of the flower.
Removing the pollen source will inhibit pollination and will lengthen flowering duration.
Lily flowers have various structural parts. Petals, which give the trumpet flower shape and encase inside male and female parts. It's important to know the difference.
Male: 6 stamens (thin filaments) and anthers which carry the pollen.
Female: The long stigma, style and ovary.
 |
| The sticky, fleshy stigma. In pollination, it accepts the pollen and fertilizes the ovary down the long style tube which connect them together. |
 |
| In this photo, the filaments have had the anthers removed. |
The trick to doing this is to remove the anthers at the end of long filaments inside the flower before they release the yellow powdery pollen.
 |
| Here, 6 anthers are removed and you can clearly see they have no powdery pollen residue. |
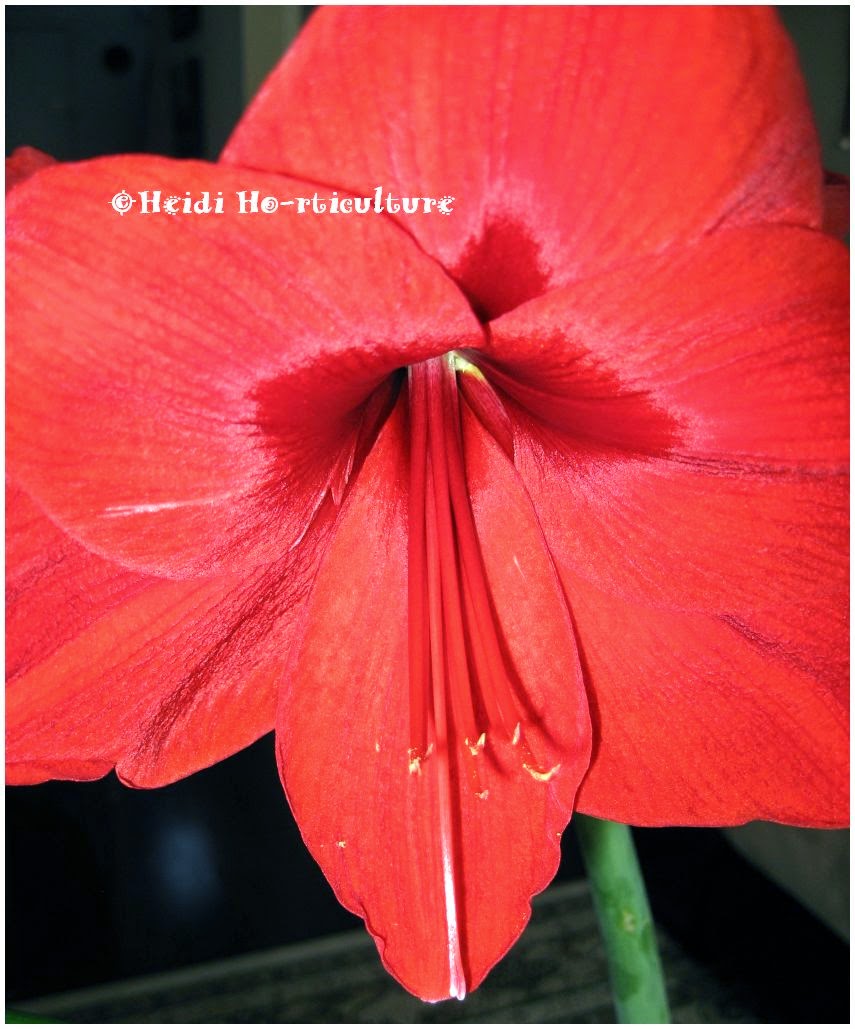 |
| In my experience, the flowers last several days longer with this removal. |
Carefully wrap your fingers around the anthers, making sure you protect the stigma below and tease away gently before pollen is dispersed. The trick is not to get any on the sticky stigma.
Do this as well with amaryllis and any other lily. Most florists and garden centres do this for you, but if you buy potted plants or cut flowers which are in bud, it'll be up to you to achieve a lengthier bloom time with this trick once the flowers open.
Have a go!
↧
↧
Yucca filamentosa - Maintaining and Sustaining
I find most Yucca filamentosas are never properly taken care of. Folks don't realize that hardy yuccas require regular maintenance and a little TLC to get them to last for more than a few years. Otherwise they die out and look tired.
Here's how to maintain them:
Yucca filamentosas expand and grow to become clumps. They flower generally after they reach 2 to 3 years in age.
A long spike of white flowers emerges from the centre of each plant in late June and blooms for about 3 weeks. Once the flower stalk begins to go to seed, the flowered plant begins to whither and die back. The trick is to peak beneath the foliage in order to find little plants emerging from the base. Sometimes, if the 3 year old original plant starts to fade and wilt over, it smothers the young, new growth that will come from the root system. You must cut out the parent plant and allow the younger ones to breathe and emerge properly. Parent plants will not re-bloom.
Yuccas have deep root tubers. They can go down to 24" or more. Tough plant to dig out. Once the parent plant dies back with the old flower stock, the base of the plant begins to rot and can cause other smaller roots to rot with it. As the foliage starts to brown, the plant beneath loses vigor and it will fall on to itself. Making it rather untidy.
Once all the flowered plants have been removed, you will see baby yuccas around the base of the original plants.
Old, dry, and damaged blades of foliage should be completely removed, not cut out. You'll need to do this in succession. Leaves wrap around the stem as it whorls up to the centre. Remove each this way, and they will come off with ease. Ripping them out of sequence will damage the stem or leave remnants of the leaf base still attached. These will whither and rot, causing some rot to occur at the root level. You want good air circulation to strengthen the stem.
Yuccas will force new growth from the centre, adding newer leaves during the growing season. Within a growing season, they will become deep green again. Much needed light and air then can help newer growth emerge and keep your yuccas looking vibrant and not limp or discoloured.
Winter maintenance:
If you have many clusters of yucca, all healthy and the flowered plant removed, sometimes it's best to tie up the blades of foliage into a pony tail of sorts. This keeps the foliage off the ground and away from moisture and soil. Rip off one long leaf from the base of the plant. Use it as a binding. Gather the blades at the base and use the binding leaf to keep the plant together. This will keep the foliage upright and away from standing water or mushy soil. Come spring, remove the binding and allow the plant to fall into natural habit.
By removing older plants, newer plants will take over and you will be able to enjoy yuccas in your garden for a very LONG time, without them looking like they need to be yanked out.
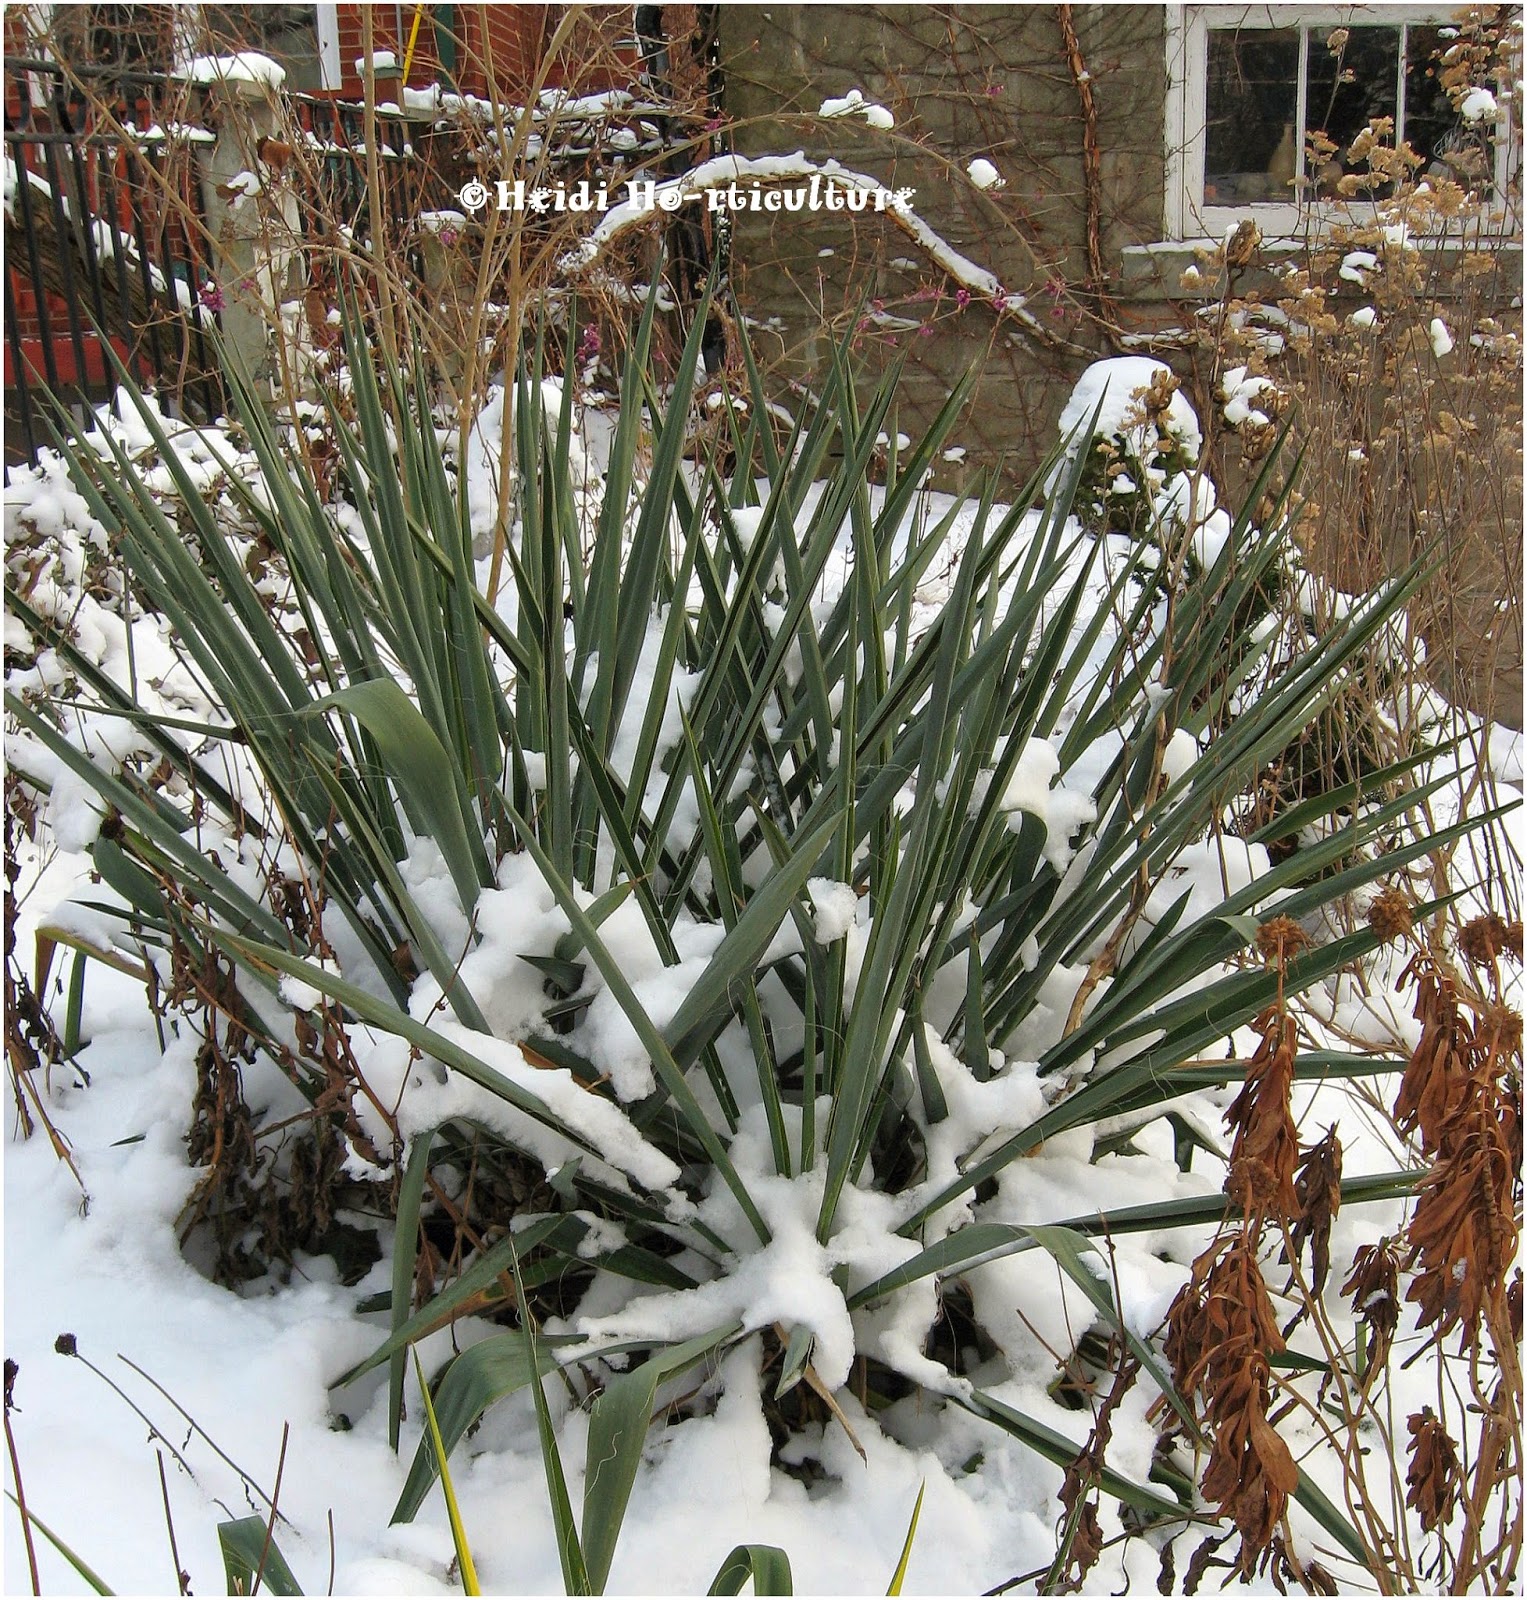 |
| When healthy, even snow won't weigh down older yucca leaves. |
Yucca filamentosas expand and grow to become clumps. They flower generally after they reach 2 to 3 years in age.
A long spike of white flowers emerges from the centre of each plant in late June and blooms for about 3 weeks. Once the flower stalk begins to go to seed, the flowered plant begins to whither and die back. The trick is to peak beneath the foliage in order to find little plants emerging from the base. Sometimes, if the 3 year old original plant starts to fade and wilt over, it smothers the young, new growth that will come from the root system. You must cut out the parent plant and allow the younger ones to breathe and emerge properly. Parent plants will not re-bloom.
Yuccas have deep root tubers. They can go down to 24" or more. Tough plant to dig out. Once the parent plant dies back with the old flower stock, the base of the plant begins to rot and can cause other smaller roots to rot with it. As the foliage starts to brown, the plant beneath loses vigor and it will fall on to itself. Making it rather untidy.
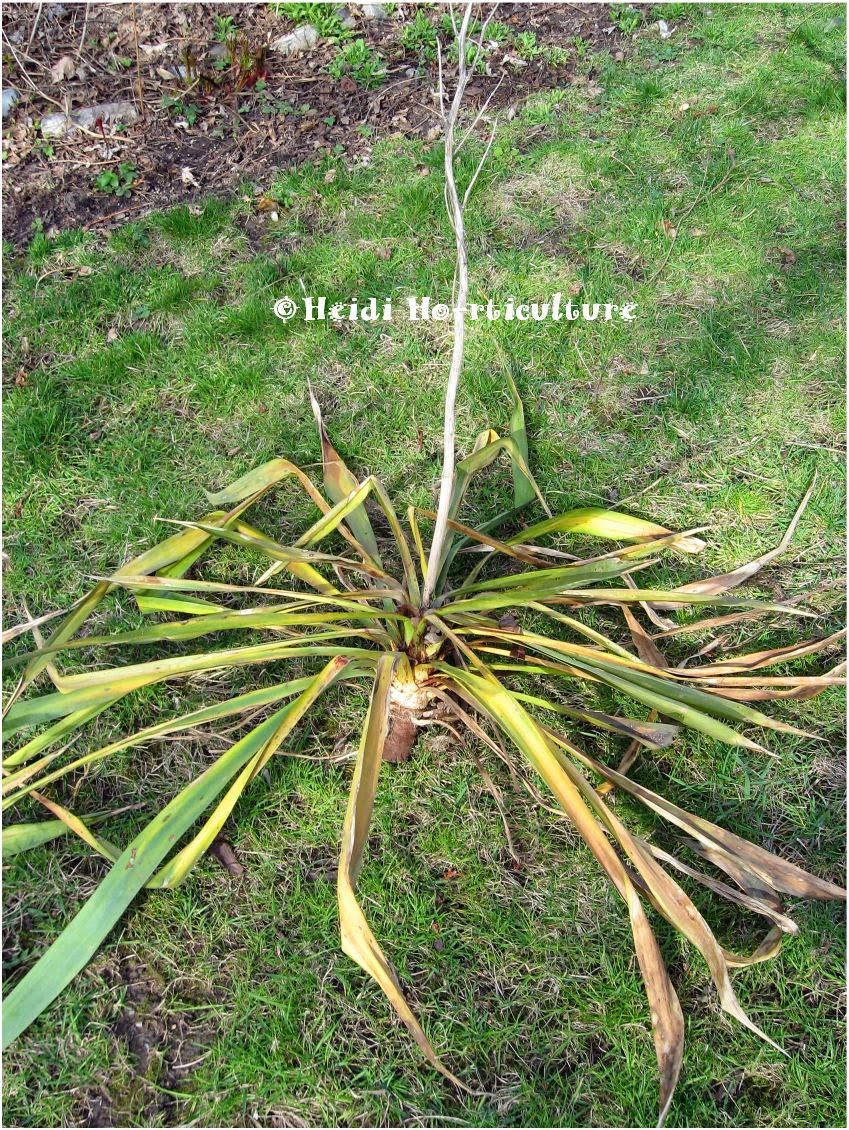 |
| Like I did here, cut the whole parent plant out. Be sure it has the flower stalk like this one. |
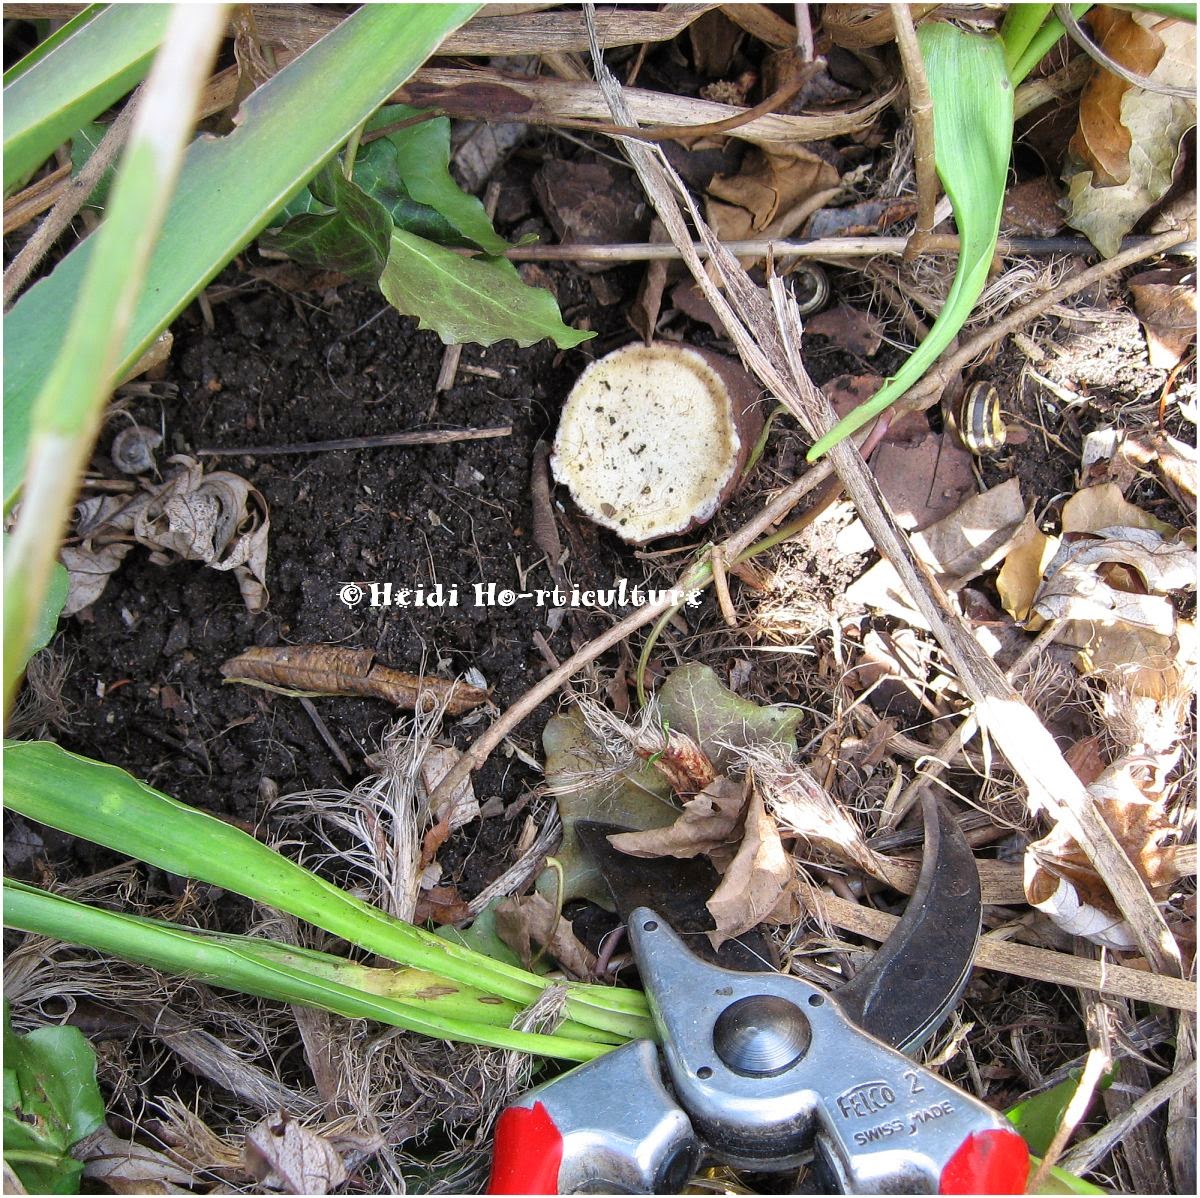 |
| It is easiest to cut out with open pruners, using the blade like a knife and slice it out as close to the ground as possible. They are like potatoes, quite juicy. |
 |
| Lift up all the blades of yucca and remove any discoloured or brown leaves from the stem. |
 |
| Pull down on the leaves - quite hard. |
 |
| Like celery, they snap clear off the stem without causing damage. If you yank on them upward, you can yank the whole stem away from the root. Always pull downwards. |
Old, dry, and damaged blades of foliage should be completely removed, not cut out. You'll need to do this in succession. Leaves wrap around the stem as it whorls up to the centre. Remove each this way, and they will come off with ease. Ripping them out of sequence will damage the stem or leave remnants of the leaf base still attached. These will whither and rot, causing some rot to occur at the root level. You want good air circulation to strengthen the stem.
Yuccas will force new growth from the centre, adding newer leaves during the growing season. Within a growing season, they will become deep green again. Much needed light and air then can help newer growth emerge and keep your yuccas looking vibrant and not limp or discoloured.
Winter maintenance:
 |
| Tough winters can cause this - half the foliage yellowing and the main core limp. |
By removing older plants, newer plants will take over and you will be able to enjoy yuccas in your garden for a very LONG time, without them looking like they need to be yanked out.
↧
Over-seeding Patchy Turf With White Clover
 |
| Frustration kicks in every spring when it comes to grass lawns. |
What to do.
 |
| We decided to over-seed with White Clover (Trifolium repens). This brand: The General Seed Company. |
First, we dealt with the sad looking turf. We mowed the lawn at the lowest setting, without scalping the turf. Then we de-thatched the grass lawn by raking it thoroughly.
 |
| We raked out about 3 of these large containers full. Even removing some green blades of grass to make sure soil is exposed. |
We purchased soil in bags. We checked local flyers for deals on bagged top soil. Pays to shop around. The bagged soil has no weed seeds. Enough said. Worth the extra expense IMO. Try not to use fluffy soil. Add sand to peat based soils.
Any bare turf pockets, we back filled with soil and raked it into the existing grass.
Leveling the ground as we raked. The bare spots had over 1-2 inches of top soil.
Various Clover Seed lawn instructions mentioned that the best way to overseed clover in smaller areas is to incorporate and mix the seed with soil before applying.
 |
| Clover seed is similar looking to mustard seed. It's quite tiny and to seed directly by hand, would cause too much concentration in some spots vs others. |
 |
| Cutting an old jug like this - to make a scoop, we over-seeded the mixture on to the bare spots first. |
 |
| Sprinkling it as even as possible. |
 |
| I again gently trampled the sprinkled mixture on the bare spots and then took a corn broom and swept over the areas. |
Once the bare spots were over-seeded, we sprinkled the soil/seed mix rather sparingly over the grass.
To make sure the seed gets in between the grass, down to the soil level, we fan raked the turf thoroughly. Our expectation is to see clover pop up between the grass, eventually overtaking the grass once it gains vigor.
With the last bag of soil, we lightly top dressed the lawn over the seed. Being more generous with bare pockets. Just enough to cover the seed.
 |
| Just use your fingers to flick the soil sharply and it will scatter quite evenly. |
 |
| All done. |
Note: It also attracts bees. For some this may be a deterrent, but with declining bee populations, we welcome them to our landscape.
Let's hope it works out.
Will update on progress and durability.
Please look at my blog's left panel for more alternative lawn choices.
↧
Fascinated Over Fasciation
Couldn't help the corny post title.
Plants never cease to amaze me, they create such interest and wonder.
To define: Fasciation is an abnormal condition of plant tissue growth that happens on the apical meristem (tip growth) of the plant. It generally creates a flattened portion of tissue, looking like concentrated stems all fused together in a clump. I've seen it happen with flowers, fruit and sometimes the root.
Interestingly enough, some offshoots of this sort of growth have created new cultivars - like Fasciated Willow, used widely in the floral industry.
I've seen fasciation on very few deciduous shrubs - mainly willows. Never yet seen on lilac as this one.
Cause: genetic, bacterial, viral, fungal, hormonal and of course, environmental. That's my guess in this situation. This lilac is flanked by a salted walkway and roadway in the winter. Quite exposed to prevailing winds. However, I may be wrong.
Quite fascinating.
Plants never cease to amaze me, they create such interest and wonder.
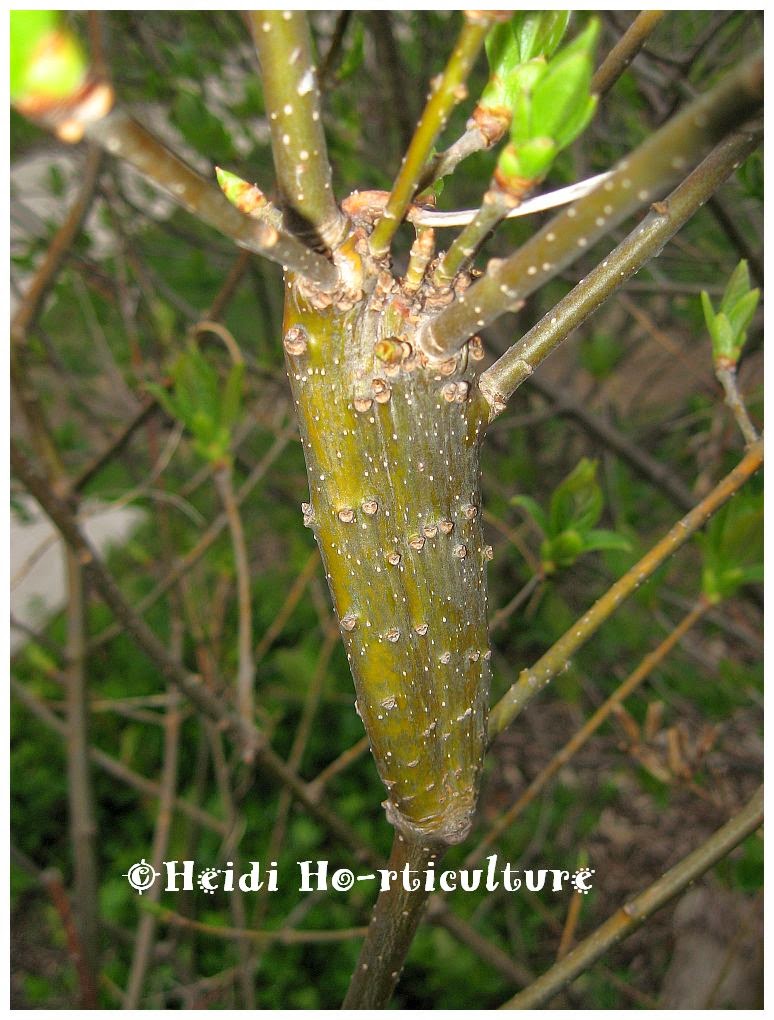 |
| Here, fasciated growth has formed on a tip of this Lilac (Syringa vulgaris) stem. You can see lateral buds trying to form, but are squeezed and hardened. |
 |
| Here's another unusual growth on the same shrub. |
 |
| Comparison to a normal apical stem tip. |
I've seen fasciation on very few deciduous shrubs - mainly willows. Never yet seen on lilac as this one.
Cause: genetic, bacterial, viral, fungal, hormonal and of course, environmental. That's my guess in this situation. This lilac is flanked by a salted walkway and roadway in the winter. Quite exposed to prevailing winds. However, I may be wrong.
Quite fascinating.
↧
Photo of the Month - May
↧
↧
Hit 100,000 Views - Thank You!
↧
Perennial Plants for Shade - Part 1
Outside of Hostas, folks ask me all the time what perennials grow in shade. There's a plethra of selection nowadays. Here is part 1 of my top choices for perennials that endure shade. Most of them are selections from my wee little garden. These perennials last. Unlike some which are borderline hardy, these have provided endless struggle to survive and fair beautifully.
Note: when I say shade...my backyard in peak growing season get's about 3 hours of dappled sun. Definitely more shade than sun. My choices here don't reflect plants that grown in complete shade.
Moist (yet free draining soil) Shade:
Well Drained (soil) Shade:
Ground Covers:
Much more to come...
Note: when I say shade...my backyard in peak growing season get's about 3 hours of dappled sun. Definitely more shade than sun. My choices here don't reflect plants that grown in complete shade.
Moist (yet free draining soil) Shade:
 |
| Astilbe sp. (flowers late June) |
 |
| Astrantia major (Masterwort - flowers mid June) |
 |
| Pulmonaria officinalis (Lungwort - flowers early May) |
 |
| Dicentra spectablis (Bleeding Heart; white - flowers mid-May) |
Well Drained (soil) Shade:
 |
| Japanese Painted Fern (Athyrium niponicum'Pictum') does quite well in free draining soil. |
 |
| Various Hosta fortunei (my preference are thicker leaved varieties, which have better slug resistance) |
 |
| Rudbeckia sp. Indian Summer Black Eyed Susan (flowers July-September, self seeds too) |
 |
| Eupatorium rugosum 'Chocolate' (bronze brown foliage in June, paling to green, flowers early September) |
Ground Covers:
 |
| Hedera helix, Evergreen English Ivy (evergreen) |
 |
| Lamium maculatum 'Cannon's Gold' (flowers on new growth) |
 |
| Lamium maculatum 'White Nancy' (white flowers on new growth) |
Much more to come...
↧
Boxwood Leaf Miner - Monarthropalpus flavus (continued...fly stage)
In an earlier post, I captured photos of small Boxwood Leaf Miners- Monarthropalpus flavus (boring worms) that feed between boxwood leaf tissue. In this post, I captured the worms, now emerging as pupae, transforming into adult flies.
I noticed this process has gone on for about two days. It's now late May, we've had brilliant sunny days and I suspect another day or two and all the egg laying will be done. Many adults were dead and left hanging up-side-down. It's a pretty short adult life span.
Best to prune the tips of growth a week or two after this process is complete. This removes the eggs and then the boxwood will respond with putting on new growth without any adults left to lay more eggs.
Neat process to witness entirely. Have a look at my previous post on Boxwood Leaf Miners - the worm stage.
 |
| The flies time it perfectly. The tender new leaves have soft tissue, easy to poke their eggs into. |
 |
| Interestingly, when it's windy, the flies have little success attaching their egg laying bottoms to the leaf. You can easily swat them away at this point. |
Best to prune the tips of growth a week or two after this process is complete. This removes the eggs and then the boxwood will respond with putting on new growth without any adults left to lay more eggs.
Neat process to witness entirely. Have a look at my previous post on Boxwood Leaf Miners - the worm stage.
↧

