Quantcast
Channel: Heidi Horticulture
Viewing all 215 articles
Browse latest View live

What a little heat can do!

$
0
0
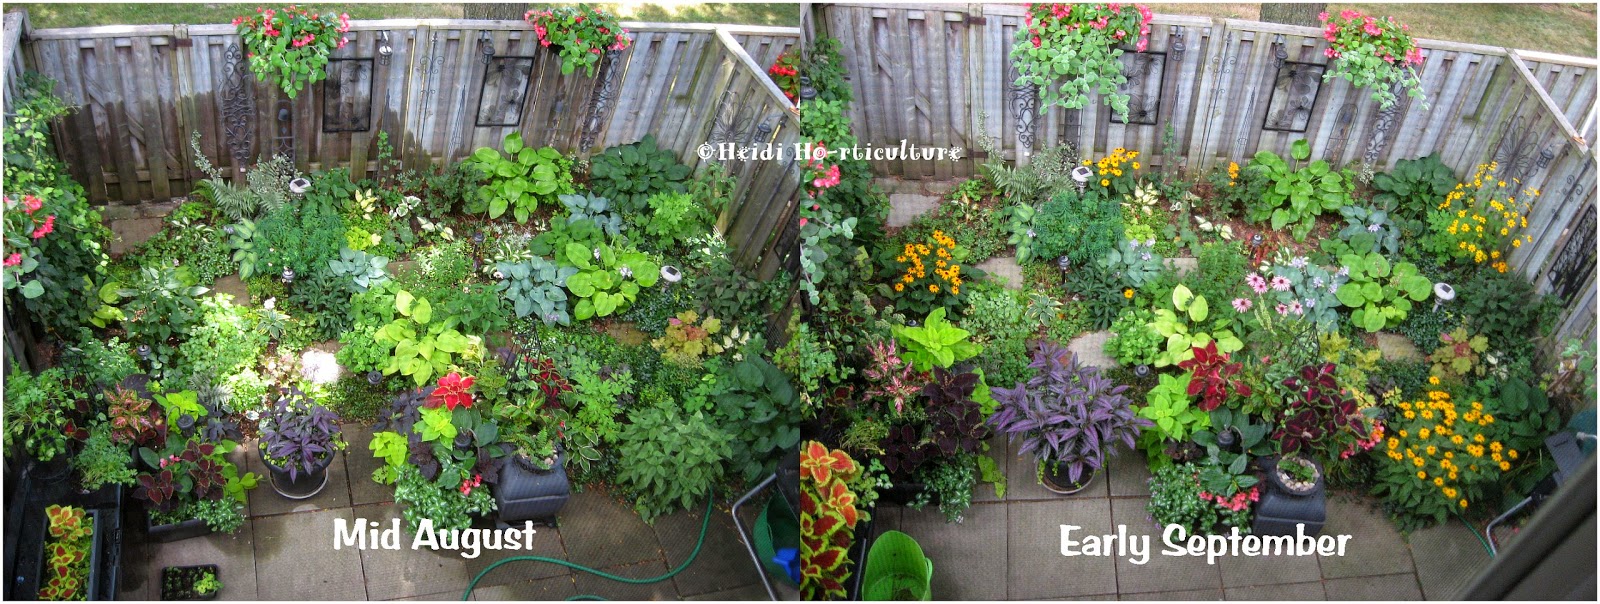
This summer's weather has been peculiar. Working in the cooler temps has been absolutely comfortable and I am grateful for this weather trend. However, the plants in containers haven't responded the way they usually do.

Here is my backyard as an example.


The plant material in the ground is unchanged (except for blooming). Yet, within 2 + 1/2 weeks, my containers have burst into a growth spurt. I use granular blood and bone meal when mixing my potting soil before planting and every week a bath of compost tea. All of July and early August it was a slow go. Two weeks of hotter, dryer conditions and presto.

Making most of the heat and enjoying its perks.

Whacky Echinacea

$
0
0
I see weird and wonderful things when it comes to plants.

How about this three in one bloom...

This patch of Echinacea has gone through the ringer. Drought stress, foot traffic and salt drift from both roadways and walkways close by.


Resulting in two smaller flowers coming straight out of the "cone" centre of the original bloom.

On this one, nearly a dozen flowers off shooting from one bloom. Crazy!!

I decided to leave them, to see whether they will grow any larger or set seed. Just intriguing to see and learn. A certain means to ponder.
Plants are incredible.
 ----
Update: A colleague of mine diagnosed what is happening to these Echinicea.  Aster yellows is what is causing this strange growth. It's a chronic, systemic plant disease caused by a bacterium-like organism called phytoplasma. It can be transferred around by small insects (leaf hoppers and mites). It's best to remove and destroy the entire plant, so that other Aster family species of plants close by don't get it.

Coooooool! Learning something new every day. That's why I love plants!

September - Time to collect seeds

$
0
0
September is the month where you get a true bumper crop of selection when it comes to seed. Last year's harsh winter claimed many casualties in the garden. Collecting seeds now can prevent the loss of many plants that self seed readily.

Yesterday I managed to collect seeds from:


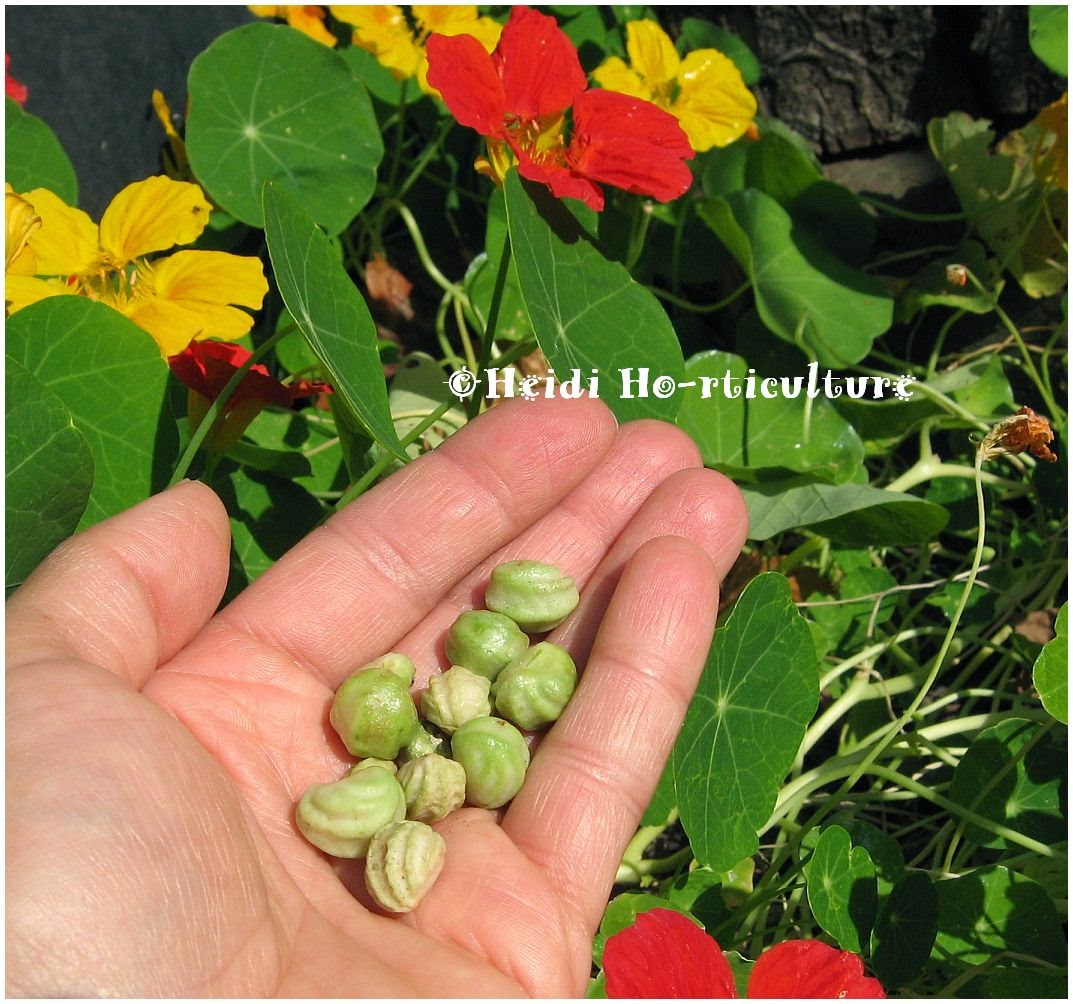
Nasturtium (please don't pull off the seed pod, if they naturally come free with a little effort, then it's the right time to collect).

Coriander. I let these dry completely on the bolted growth. Half I usually leave overwinter to allow natural reseeding, half for culinary purposes. Taking a few in case this winter kills them off.

Don't eat all your snow peas. Allow some to go to seed. Wait to collect once the pod goes yellow.

I love this allium. I rather not divide this young plant yet. Instead I would like to try and...

grow from seed next spring. Seeds are now dry, still encased in the pod.

Hemerocallis is so easy to grow from seed. Be sure to collect the pod, not the flower bud. Note the difference.

One of the easiest perennials to grow from seed is this common Coreopsis. Just allow the seed pod to dry completely on the plant before collecting.

Once some seed begins to fall off, or eaten by birds, you know this is the right time to collect Rudbeckia seeds and...
...Echinacea seeds. Please leave some for the birds. Yellow Finch love them. They provide fabulous winter interest in large clumps.

With Gaillardia, I leave many pods alone for birds too. Because of that, sometimes nature does a better job in plant production than I do. Come late spring, I find baby Gaillardia all at the base of this plant. But just in case we have a tough winter like last, I've taken a few for safe measure.

With Common Rue (Ruta graveolens), I deadhead and harvest the seed, so it doesn't seed itself everywhere. This is a tough one to die off. However, collecting the seeds now gives me a chance to give seedlings in spring as gifts. So easy to propagate.


With this Siberian Iris, I enjoy leaving their seed pods for winter interest. Thankfully, the pod stems are rigid and sturdy enough that you can bend them over and collect without taking the attractive seed pods off.

The best way I find to make sure you don't get debris mixed in with seed for storing, is to just empty the pods onto a sheet of white paper. You can lightly blow off the unwanted bits and the seeds remain to be packaged away.


I hate waste and I learned this from my Mother. If you get return envelopes from your utility bills, save them by:
1. Licking the envelope closed. Then cut the envelope in half.
2. Cut about 1/2 inch away on one side of the newly cut area to make a fold over flap for the new envelope.
3. Flip over and crease.
4. Be sure to write the name of the plant and date ahead of time before inserting seed. Tape closed.

Store in a cool, dry, dark place. Ready for March (indoor propagation) or May (sown right outdoors).

Photo of the Month - September 2014

$
0
0
Even though this Echinacea bloom hasn't fully unfurled, its intricate detail astounds me.

Suckers or Water Shoots on Corylus avellana contorta

$
0
0
 

This lovely Corkscrew Hazel (Twisted Hazel), also known as Harry Lauder's walking stick has been reacting to last winter's tough exposure. Suckers (or water shoots) are appearing from the root zone beneath.  This proves this specimen has a grafted rootstock. Some Corkscrew Hazel are in fact grown with their own rootstock. Others not.

Here you can tell the growth is unlike the contorted leaves and stems of the cultivar planted.
These are called suckers.

Remove these suckers as close to the base as possible. Even dig out some of the soil (but be sure not to damage the crown further) and cut as close to the sprouted area as possible.
A comparison of both. Lighter, green leaves and straight stems for the suckers, and crinkly, twisted stems for the Corkscrew Hazel.

If you leave these suckers, they will eventually take over and choke the contorted growth. These twisted cultivars are grafted on a regular Filbert/Hazel rootstock. Thankfully the grafted specimens are available. This gives us in Ontario and colder climates a chance to grow them - the grafted rootstock gives the plant vigor when establishing.  Would be a waste to see the common Corylus hazel take over this ideal spot next to the pond.

I think the Koi approve!

Green Living Roof

$
0
0
I don't profess to know how to install a green living roof. But I do tend to one and am completely convinced of their usefulness and sheer will to survive the toughest of environments.
The key is selecting plant material that can tolerate the extremes and making sure there is proper drainage.

Plants I can ID in the above photo: (all native)
  • Fragaria virginiana - Wild Strawberry
  • Coreopsis tripteris - Tickseed
  • Rudbeckia hirta - Black Eyed Susan
  • Gaillardia pulchella - Blanket Flower
  • Deullingeria umbellata - Flat Topped White Aster
  • Symphyotrichum ciliolatum - Blue Fringed Aster
  • Sedum acre - Stonecrop

Some plants are already dormant at this stage.

No required mowing or mulching. Leaving the seed heads is key. Self germination will determine which of the plants listed above will prosper. Making an ecosystem of its own.

The occasional intruder is what I am after. Bird droppings and the wind carry some deadly weeds, tree seedlings and grass that will unravel the balance of what works.
This is a rather large area and it's just amazing to see torrential rains just get absorbed by this living roof. I would hate to see the alternative.

The best part - the VIEW! lol

Bush Honeysuckle - Diervilla lonicera

$
0
0
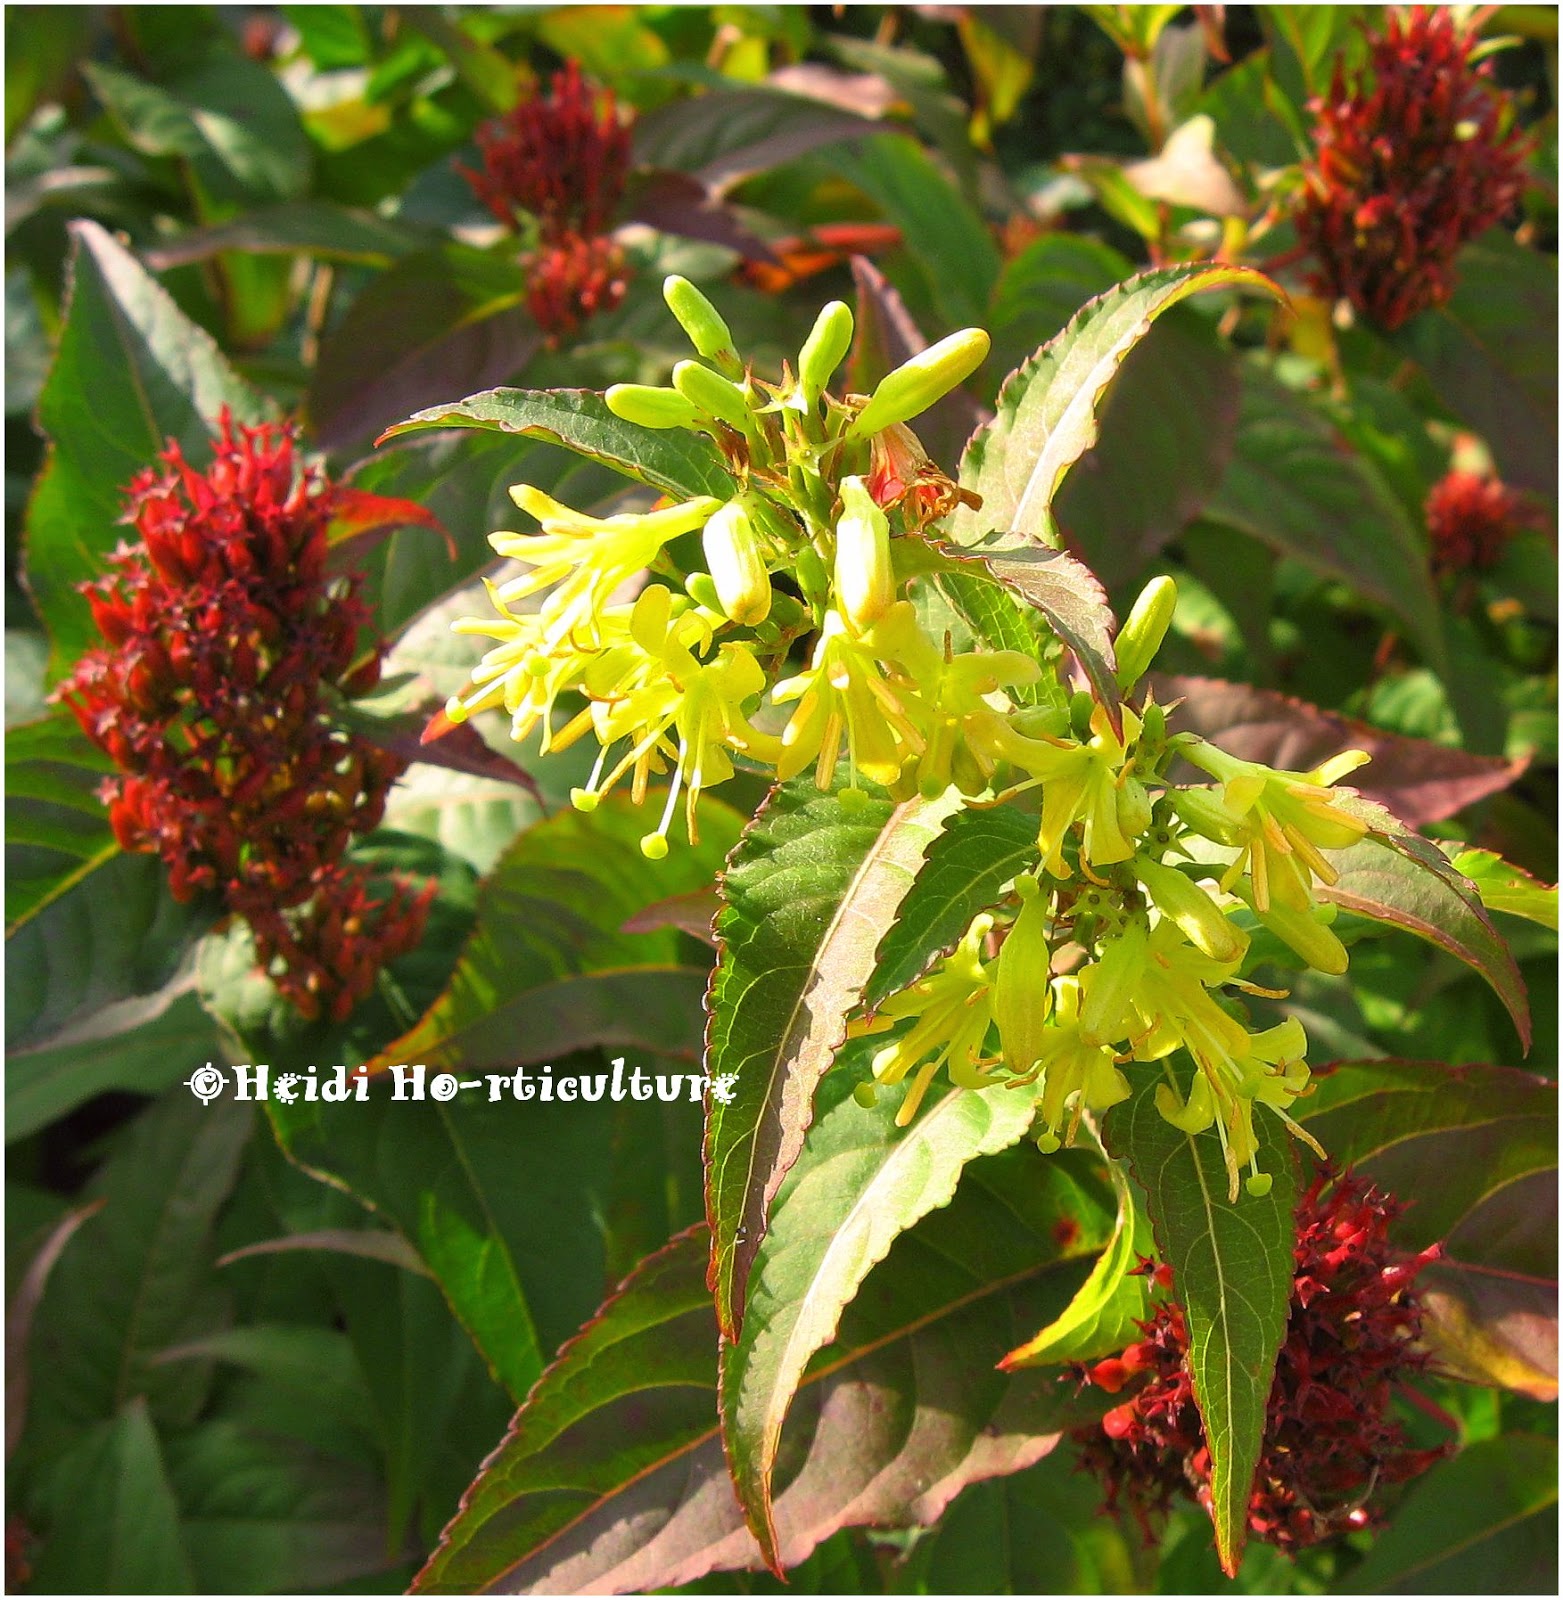
This shrub has to be the most overlooked specimen in garden centres.

I have no idea why.

During the summer, this plant has such a fully balanced form of deep, shiny green foliage that sometimes can become confused with dogwood varieties.

Attractive attributes:
  • drought tolerant
  • full sun to shade ranges in exposure
  • not susceptible to bugs or disease
  • easy to prune
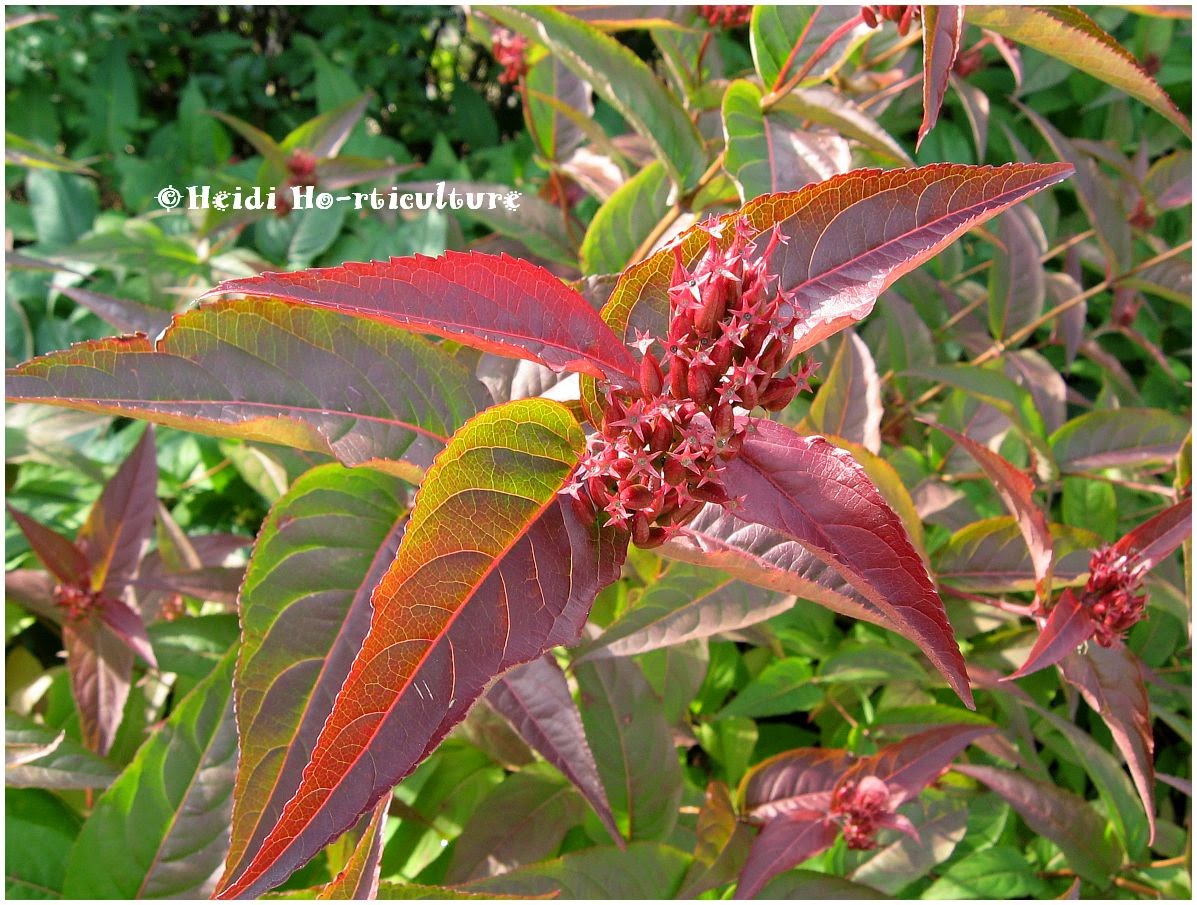
  • fabulous red fall colouring of foliage and seed heads
  • hardy (zone 3)
  • native (Ontario/Eastern USA)
  • seeds are food source for birds
  • bees and butterflies like their late blooming flowers

Not many shrubs have seed heads so rich in colour with contrasting blooms side by side.

This is just the beginning of the real autumn show. Leaves turn deep burgundy before their autumn shed. Brilliant red seeds provide winter interest.

Flowering from late July to October.  Give the shrub a harsh, rounded prune in early spring and it will provide more new growth for better flowering like above.

It's worth asking your local garden centre to order you one.

Late Flowering Perennials

$
0
0
Nothing is bleaker than seeing your garden fade in October. When autumn foliage colour, leaf drop and the hint of frost on your lawn early in the morning show signs of winter.

However, there are these lovely plants that still shine through the darkness of seasonal change. Try some in your garden:

Eupatorium rugosum 'Chocolate' - Chocolate Joe Pie Weed

Tricyrtus hirta - Toad Lily

Nipponanthemum nipponicum - Nippon Daisy

Anemone x hybrida "Honorine Jobert" - autumn flowering Anemone

Actea racemosa "Hillside Black Beauty" -  This spliced photo is necessary to get the full spectrum of our Bugbane. Its spring foliage bears the name 'black beauty' - more than rest of the season. Fern-like, bronze foliage - really wonderful texture in May. Greening up in summer, it resembles an Astilbe. But just when you think it has given up any chance of flowering, in mid August the flower buds emerge and take ages to show any sign of blooming. Come late September, you get the first glimpse of these fabulous white bottle-brush blooms. Quite frost tolerant and will flower well into November in shade. (This plant gets evening sun.)


Hostas - Autumn Display

$
0
0
Not only should you choose the right colour of Hosta for summer displays; be also mindful about your choice for autumn colour in the garden.
Once daylight begins to lessen, the hosta leaves begin to yellow from their tips.
I find, basic green and blue leaved varieties have true golden colours as autumn progresses.

The golden or chartreuse leaved hostas turn creamy yellow in autumn.

If you have evergreens as backdrops, or evergreen ground covers, choosing varieties like:
  • August Moon
  • Paul's Glory
  • Big Daddy
  • Blue Angel
  • Sieboldii Elegans
  • Mouse Ears
  • Francee
  • Great Expectations
  • June
  • Krossa Regal
  • Royal Standard
  • Sum and Substance
  • Regal Splendor
  • Plantanginea
The golden leaf colour is accentuated by the English Ivy's evergreen foliage.
...will really make a great display. I have experience with the above. Some turn early and some late. It's really fun to notice the changes.

I find slight variegated varieties of Hostas colour up well too. The pale leaved varieties which have less chlorophyll (green) have less golden colouration in autumn. For the most part, all Hostas will yellow - some more than others.

If you want the autumn display to last, be sure to keep the hostas watered. Or like the above photo, tips will begin to dry out and become brown.
Timing and frost free conditions are key as well. Once the frost hits, the leaves wilt - colour is gone.

Enjoy them whilst you can!

Heidi's Helpful Hints #1 Baby Divisions or Seedlings

$
0
0
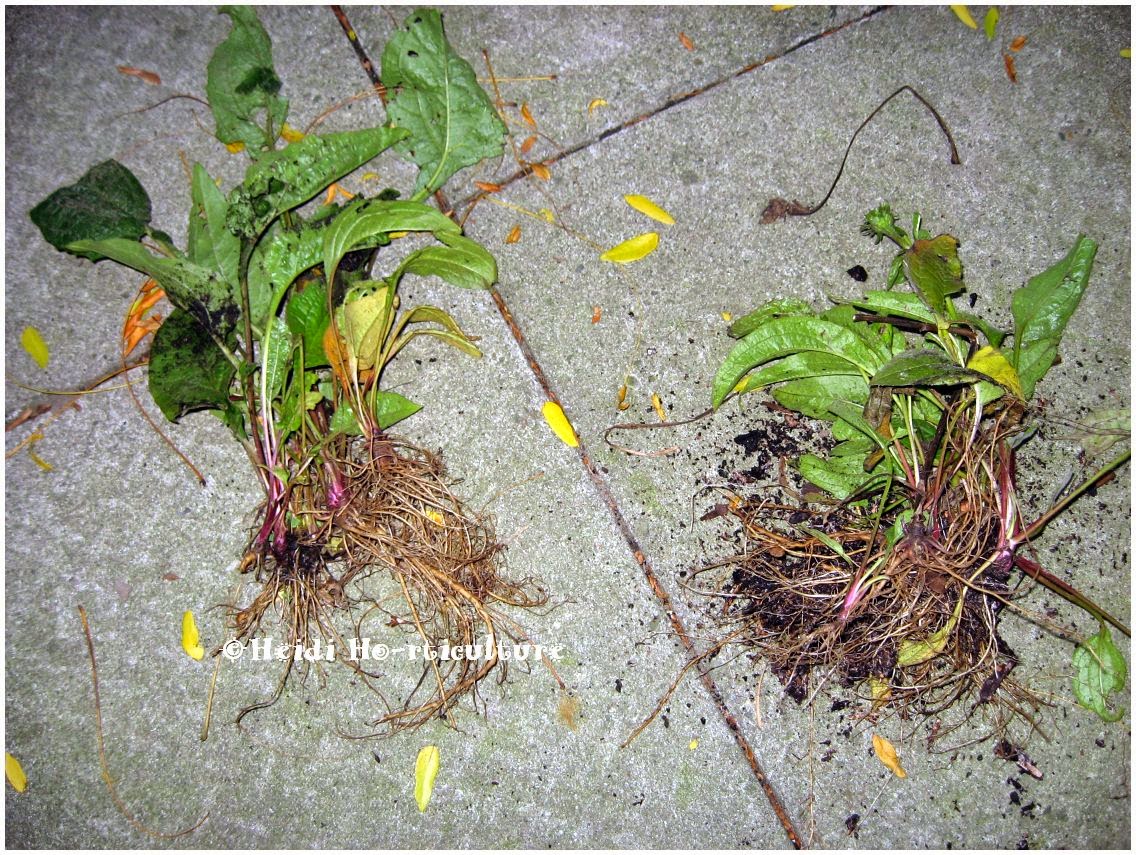
A late season score: I found these gems in a compost pile out for pick-up in my 'hood: rejects of Echinacea. My eye caught them before curb collection. Nine plants in total.

Be sure to examine all the leaves and the roots to find any issues; disease or possible rot. Discard if so.

This is the hint:  even though there are a bunch of tiny plants, instead of planting them separately and having to wait ages until they bulk up - group them instead. Here I've clustered the separate plants together, making two groupings.

Dig a large enough hole and place all the divisions together, making sure you don't squish them, allowing just enough space for adequate root growth. 

You can do this as well with the self seeded "plant-lets' that are generally around Echinacea in the garden. A great idea to pot them up as gifts for a friend. This method will allow for less wait time for the plant to establish and plentiful flowers for next summer.

Composting Leaves - Mulching

$
0
0
By the time all the leaves have fallen, nearly 10 piles just like this will be raked from the backyard.


Before you service and put your lawn mower away for the winter, use it as a mulcher for that huge pile of leaves.


Be sure not to have the wheels set at the lowest level. Mid range is best, so that you don't lift stones and or larger branches that may damage the blades. We removed the clipping catch bag. This way the leaves are forced to cycle around the blade dome - mulching far more quickly. But if you prefer to use the bag attachment, just mow the lawn with the leaves.

Raising the back end and the front end whilst hovering over the pile really helps to break down the debris faster and won't overburden the motor.

Three passes and that pile is nearly gone.

This is worth gold to me. Pure carbon and an insulating winter blanket for the red-wigglers in the compost bin. Mulching the leaves this way helps to accelerate the breakdown their matter. Making compost quicker. It also leaves less air pockets, which means more room for more leafy mass.
As the growing season went on, we generously removed finished compost for the garden. Now it's near empty.

One leafy layer, now ready for a wet green layer (grass clippings).  Reserving some of the ready compost on the side, we will top dress the mulched leaves with it before putting the compost to bed. Hope our red-wigglers will be happy - toasty warm.

If you can, reserve a bushel or two of leaf mulch for evergreen hedges like this white cedar hedge. The chopped up leaves help insulate the roots and prevent weeds come spring.

Photo of the Month - November 2014

$
0
0
My Stolwijk Alpina Clematis seed heads are so beautiful right now. Having flowered in late May, they still bring interest to my little garden in November.

Fothergilla - The Unknown Shrub

$
0
0
Today, I witnessed a dreadful act: a pruning job gone wrong.

Of all things to prune improperly, I saw someone hacking at a Fothergilla shaping it into a ball. I was working across the street and it took everything in me not to go over there and say: 'What are you doing?' The reason I care, is you often don't see this shrub in many gardens. Another reason: in most cases, it is a dwarf form, growing so slowly with such a naturalized habit - pruning is essentially unnecessary, in my opinion.

Some folks think it's a form of witch hazel. True enough, Fothergilla gardenii foliage is similar, but white bottle brush flowers appear in the late spring before the leaves emerge. Quite fragrant. In October, the foliage turns bronze.

When most shrubs have begun losing their foliage, Fothergilla begin to dazzle you with their reds, and orange hues in November.

Early flowering shrubs, like the Fothergilla, already have their flower buds on the stems at this time of year. Pruning such plants removes the flowering potential for next year. Please, if you do prune, thin out, tidy and prune after flowering. Preferably not in box or ball shaped forms. Please.

Thankfully, this one will grow to full maturity without being hacked into a ball.


Cold (Frost) Tolerant Herbs

$
0
0
Since a wintery blast has come a fair bit earlier than anticipated, I was not prepared enough to rescue my herbs for culinary delights. Usually, when I know the temperature is going to change so drastically, I try to cut back, dry and store what ever I can save out of my herbs.

Thankfully, this demonstrates how resilient many of them are.

Whether you grow them in a pot...
...or in the ground - parsley handles the freezing temps quite well.
Last nights temps dipped to -5°C. Burr!

So does my oregano. It still has firm foliage.


So does my thyme!

I have better luck with growing rosemary in pots, this one I shall take indoors for winter use. It's fine. I will however, expect some needle drop from the shock once indoors.

(Sorry, out of focus because my hands were freeeeeeezing!) And of course, mint. Going to enjoy a wonderful mint and red beet salad - the last of the season!
Needless to say, with all my procrastination, I am thankful for being able to harvest the last of our yummy herbs. The snow has also helped to insulate the last of the usable foliage.

Some others I have had success in harvesting after frost:

Lovage
Sage
Lemon Balm
Marjoram
Tarragon

Rectangular Outdoor Christmas Container

$
0
0
I love working with various shaped containers.

This one was fun to work on. Here's how:

Depending on your birch branch supplier, some are cut to specific lengths, others not. Cut to your desired height.

Don't worry if you had annuals or veggies in your container, just work out the hardest plant debris and loosen the soil a bit. Soil works just as well as sand. Sand is great for smaller containers. This large container won't budge in the wind.

For this design, I decided to make a line of birch. You could stagger them, or clump them in the middle. Be creative! Skewer the birch into the soil, making sure they are fixed down deep enough to endure wintery winds.

Begin by selecting several kinds of greens. Here, starting from the top left and going clockwise are: Princess Pine, BC Cedar, Oregonia and Green Boxwood. Use what you like. My combos just seemed to work well with the beige tone of the container. I cut the boughs into smaller sections, this gives more of a bulkier look to the design and it saves some money in the long run.

Begin by skirting the base with pine and then add layers of other greens as you go.

I've been making Christmas containers for a long time and recently, the selections of outdoor accents have increased exponentially. The most important factor: use what you like. I prefer more natural tones and I try to find product that will last me more than just one season. There's so much selection out there. I've used (clockwise) Magnolia stems, cones, pods, pussy willow stems, and artificial berries.
Hoping the postal worker will enjoy delivering the mail this Christmas season! The neutral and more natural tones will also carry this container well into February. I am hoping the pussy willow stems will begin to show their fussy flowers come March.


New Year Approaching; New System

$
0
0
Having not posted at all this December, I feel rather at odds. My creative flow is beginning to be fulfilled; having purchased a new computer system. I don't know where to begin with upgrades. I hope that 2015's posts will be far more visually appealing. Till then, I wish you all a very Happy New Year! 

How To Take Cuttings from Trailing Houseplants

$
0
0
Whether you desire to add to your houseplant collection, or merely desire to learn how, trailing houseplants have to be the easiest plants to propagate.

Here, I established a Purple Passion Plant quite easily. 2 months old and it needs to be up-potted and centred properly in a new container.

Here's how:

Once trailing plants have enough stem growth and length, you can begin cutting off  12 inch segments, or even more - better to be longer than shorter. Cut the stem off below a leaf joint.

This Hoya has lovely rootlets already forming. Cut segments with these if you can. Several trailers have this form of root establishing on stems.
This Hedera helix Ivy has them as well.
The Purple Passion plant I established above had no rootlets. I just selected sturdy, healthy stems with leaves with buds at their base.

Gently pull and tease the leaves off the stem. At this axil joint, roots will develop.

Again, take a foot long sturdy length...

Remove all leaves from the bottom end and leave one or two leaves at the tip.
All I did was wind the vine portion with no leaves inside the base of a glass and situated it near a window in the bathroom. Indirect light and humidity from the bathroom is ideal to help initiate root development.
Every week, I would rinse and refill the glass with fresh water and now you can see, ample roots have established. It's time to pot up.

Please, don't wait too long to pot up. Once the roots are about an inch or so in length, it's perfect for soil. Too long, and the roots will struggle in a dryer medium, having been used to water all the time. Also, only so many nutrients are suspended in tap water and the plant will suffer too long without soil.

Take potting soil and dampen it a bit. Remove the vine stem from the glass gently and place into empty pot. Gently fill the pot with the dampened potting soil and tap the pot on a surface to help compact the soil. Be gentle, as tiny hairs are on the rootlets and you don't want the soil to damage them. I thoroughly water the pot at first, just after transplanting from the glass. I do not water the plant again, until the potting soil is dry. Overly watering these cuttings can result in root rot. You have to play it by ear.  Watch the plant for several days after you transplant it into soil. You will see foliage droop or curl if they either are too dry or too wet.

These two variegated hoyas were made by cuttings from one original parent plant. It's so easy!

Other plants that can easily be propagated this way:

German Ivy (Senecio mikanoides)
Pothos or Philodendron Vines
Peperomia
Plectranthus

Endless possibilities. 

Bee-hind In Understanding

$
0
0
Today, I was very fortunate to have training on the importance of pollinating critters, specifically BEES.

My un-informed self was quite educated today.

I knew of the decline in bee populations as of late. It's quite alarming, but what I didn't know was the sheer difference between Bumblebees vs Honeybees.  Please see the below link for a Bumblebee vs Honeybee brochure put together by Wildlife Preservation Canada.
Photo from www.wildlifepreservation.ca 
Bumblebee Brochure WLP

One eye opening fact I learned today: Canada has NO native Honeybees. Honeybees have been imported from Europe.

Canadian Bumblebees, Solitary Bees and Leaf Cutter Bees are quintessential for pollinating crops, and plant life all around us. They are in decline. We need to be informed of their differences. We also need to provide more of their habitat which is threatened.

Please take the time to visit and learn more about bees and insect pollinators - how we effect and contribute to their decline at: http://wildlifepreservation.ca/insect-pollinators/

Informed gardening techniques can make a difference. Be that change.

Here's how:
Poster of Plants That Attract Bumblebees from Wildlife Preservation Canada

You know Spring has arrived when....

2015 Canada Blooms

$
0
0
I had the pleasure of seeing green again this week. After our harsh winter, it was a joy!

Here are some of the snap-shots I took. Very busy day to visit. Was glad to see so many people soaking it up.

The living wall trend is still alive:

The use of Echeverias and German Ivy worked like a clockwork!  :) 

To be honest, I prefer this scale. I'd do this in a heart-beat, if I had a hot brick wall facing south/east.  For sure.

Loving the fern idea. Gonna see if I can try this myself. Fun.
 Was so glad to see the continued floral creativity. These were some of my favs:


This one had top honours and was my #1 too!
Enjoyed this little Fairy Garden. Do you spot it?
A design firm called Bienenstock Playgrounds made playground apparatus and this tree house from tree trunks and limbs. Quite impressive!
And special kudos to the TBG for having a 4 balcony (room) Pollinating Playground showcase. Cheers to TBG's Paul Zammit, TBG staff and all the volunteers for putting together a great educational display!


Even though there were plenty of wow displays, I still gravitate towards the simpler, more DIY ideas that I could take home and easily do. Like these:


Two more days left for the show. It's combined with the National Home Show.  Lots to see and enjoy!
Viewing all 215 articles
Browse latest View live