Quantcast
Channel: Heidi Horticulture
Viewing all 215 articles
Browse latest View live

Wakey Wakey!

$
0
0
I'm growing impatient. I shouldn't. Been at this gig for a while now, yet this is the first spring where my patience is wearing thin. My shady garden is still asleep and it's the last day in March.

I am thankful however for a newer addition to my little backyard. Last spring I bought myself:
Heuchera villosa 'Citronelle'
It was buried under 2 feet of snow at one time and right now it's the only plant that catches your eye. Whilst every other plant shows signs winter stopped by, this one says "Look at me!".

Definitely going to divide this one or maybe just buy one or two more. :)
I have hope! My Hellebore flowers are beginning to swell!
The flower buds almost look like Rhubarb!


Hello Tulips!

Thursday's weather is calling for rain. "April showers; bring May flowers". YES! :)


Spring Planters=Fun!

$
0
0
Thoroughly enjoyed working in the soil today, adding some life back to these containers! Bonus: finding great supplies of pussy willow and dogwood stems on property we maintain. Perfect.

Fun fact: Did you know, the name Pansy is from the French word 'pensée'? (meaning thought or remembrance)  

Gardener's Back Pain

$
0
0
When the spring blooms begin to return, so can my 'gardener's back'.  "Winter flub": my spare tire doesn't help matters. It's hard. Now that I'm in my 40's, some preventative practices are a must.

Thankfully, because of these stretches and some common sense, I have so far obverted any down time due to back pain.


#1 : Standing straight with legs straddled, bend one knee at a 90° angle and lean down sideways, stretching the apposing leg. Hold for as long as you feel the stretch work. Repeat on the other side. 

#2 : Bending forward on one 90° bent knee, keep your weight centred on the apposing leg which is also bent to 90° under your bottom. Hold, switch legs and repeat several times.

#3 : Using a step, or anything elevated 18" or higher, place one foot on the step (I use the truck door step for this), keeping the opposing leg straight. Lean into the bent knee and press down, continuing to keep the back leg straight. Switch legs and repeat 2-3 times.

I do #4 & #5 at home before going to work.

#4 : Laying flat, I bring one knee to my chest and leave the other down straight. Holding the knee to my chest for at least 1 minute. Switching legs and repeating several times. Crossing the knee over the top of your body towards your opposing side, really stretches the lower back. Repeat on both sides and HOLD for about a minutes. What a huge release of strain. This really works.

#5 : Bringing both knees to the chest. Holding for one minute. Bring them back down and repeat several times.

#6 : Standing with straddled legs, slightly bent, shoulder width apart, twist your shoulders and arms towards your opposing leg. Twist back and forth keeping legs straddled. This really helps stretch the lower back before or after you lift heavy objects or if you have been in weeding for a long while.

Other helpful hints:
  • Bend at the knee when lifting and make sure your centre of gravity is in the hip area, not your back.
  • Don't let your lower back get a cold draft after sweating.
  • Stretch after a heavy lift (always ask for help instead of lifting on your own).
  • Make many trips with lighter loads, instead of one heavier load.
  • Do not wear a tight belt or anything overly constrictive on your waistline. This is imperative. Constricting your waist impedes your muscles from working normally, due to pressure. Here's one way to avoid tight pants constricting your waist:
I made this, but I believe maternity clothing stores sell an elastic version of this. I put it on, when I know I have a lot of bending and lifting to do in a day. This is simply a stretchy band of elastic fabric. I doubled it up and used a sturdy button. I sewed up the hole so that it wouldn't fray.

It works like a charm. Once I get back doing pruning or something else which requires less movement, I remove it and tuck it into my pocket.
End the day with a great epsom salts bath and a stretch before bed. I cannot get up in the morning without a thorough stretch anymore. These tips truly make the difference.

Earth Day

$
0
0
I get the need for these designated days. Honestly though, we need to make everyday an Earth Day. Live to make change.

Perennial Geraniums -Taking Cuttings

$
0
0

Perennial Geraniums are a gift to the perennial border. This one, 'macrorrhizum': grown primarily for its foliage (turning red in the autumn), is a great blanket for the foreground and has been a great weed suppressor for the garden. It has exponentially grown in diameter with little or no intervention on my part. Drought tolerant and super hardy, I decided to take cuttings and spread the joy around a bit more.


Some geraniums, like this one, produce thick, segmented chunky stems. Which can begin rooting on their own, if the ground is friable and there's adequate moisture through the growing season.  In the autumn (September), I chose sturdy segments, that had at least 6 inches worth of fleshy stems for my cuttings. I wouldn't try doing any later than mid-September: this way roots have a chance to mature before heavy autumn frosts.


If you don't see any roots, take a closer look: on some, you can see little bumps where roots will easily develop. I took my pruners and simply cut this segment out - closest to where it was attached.


Behind this pole, a lovely Clematis thrives. I buried three Geranium cuttings (insuring adequate spacing) around the back side. Leaving just the leaves and an inch of stem above ground. As you can see, I didn't hoe, turn over or add any amendments to the area. All three cuttings took well. Hoping their mature growth will help shade and keep the clematis robust during the summer months. 


This could be as easily done now (spring) as well. Just keep the cuttings moist during the hot summer months. 

How To Prune Roses

$
0
0
I prune A LOT of roses at work; I get asked how to go about pruning them properly. In the spring, it's important to prune to encourage good air circulation; to cut out any dead wood and remove any suckers or weak branches. Doing this will encourage new growth that will produce many flowers.

Use: sharp, clean tools:  like : Felco Pruners for thinner stems and Stihl Loppers  for hard wood, dead and branches from the ground level.

For the most part, roses flower on new growth. With the exception of climbing roses, be aggressive with pruning varieties like Hybrid T's, Grandifloras, Floribundas and Shrub roses. Especially after a winter like the last.


Don't prune back roses too early. Wait for buds that are robust. Cut the stem back to just above these buds.


At the base of the woody stems and the crown of roses, you may see new, tender shoots emerging in early May. If you have considerable dieback from winter damage, these shoots are crucial to examine. The above photo shows the new shoot is emerging from above the grafted crown of the rose. This growth is true to the cultivar that you want to see bear flowers. The photo below shows shoots coming from the soil...


In the above photo, shoots that are emerging from below the soil surface are not good. These are suckers emerging from the rootstock.

Let me explain: some of the most beautiful roses (Hybrid Teas, Grandifloras, Floribundas, David Austins...etc) are grafted plants. They have a rootstock grafted on scion stock. Scion stock bear the beautiful hybrids that wouldn't grow in cooler zone hardiness areas. The graft makes growing such beauties here in Ontario possible. When you see rootstock shoots emerging from the ground, they are a different rose than the growth above the graft. If left to grow, these shoots may take over, suppress the grafted stock and you will have a completely different rose bloom come June. Keep your eye on this throughout the growing season. Especially on older roses, where the grafted union of the crown may be heaving or sinking too deep into the soil.


I've pruned more than half of this grandiflora back. Having removed any overlapping, cross over stems, decayed, weak and dead branches.


Be sure to cut back to buds that are facing outwards - so that new growth will not be too concentrated in the centre of the plant. This keeps air flowing and gives it a more open habit.

Please don't leave stumpy, long ends to your cuts. Cut 1/2 inch above the bud (node). The is ample distance from the bud to prevent damage from cutting. Reducing the amount of stem between the buds will help engage the bud to produce more terminal growth.

In the above example, I didn't cut this rose back to the ground like some gardeners do as a general practice, as I prefer to have a taller habit and bigger show. Grandiflora roses have larger flowers. If left to flower on only tender, green pliable stems, the flowers can make these stems flop over from the weight.  Making for a weak, unattractive shape to the overall plant. Leaving woody stems with robust buds will give the rose strength and help boost flower production.

Be sure to remove all leafy debris from the base of the plant and give them a top cover of mulch or a perennial ground cover (like the Gallium plants above). This prevents the soil surface from drying out.

Come mid summer, I will post how to thin a rose bush; to create a better habit and increase bloom.

The Trouble With Heucheras

$
0
0
Heucheras have to be one of my favourite perennials. Except when they do this: Heave

My hand can wrap itself around the base of the Heuchera's crown. The crown has heaved that much!

If left like this, the Heuchera begins to fade and become weakened. I planted several cultivars: Caramel, Obsidian, Palace Purple....they all need help this year.

I find, heaving happens to heucheras when the soil they are planted in is not friable and loose. Compacted or sandy soil (like mine) or sometimes heaps of snow on top, cause this heaving and the end result showing in the above photo. It doesn't help that I have dappled shade all day. But there are ways to overcome this.

Don't be like me last year and wait too long - once the heat came in June, I lost two of my favourite cultivars. Today, it's time to pull them up.


Gently lift them and examine the crown. Like geraniums, they have a real fleshy, stalky crown which will have small mini plantlets which you can divide, as I did.


It's important to take off all the dead leaves. Heucheras are semi evergreen and like hellebores, they need to have many of their overwintering leaves removed to prevent decay of the stem/root mass. Pull them gently off the stem like you would lettuce leaves. Start at the bottom and work your way up. You'll see concentrated new growth and leaves emerging from the centre.

(The one great aspect when digging them up: you get to have more plants!)

Be thorough. With your fingers, remove any callused or flakey bits around the stem - by doing this, you'll reveal tender, fleshy white nodes that will produce new baby plantlets and roots.

Dig a bigger hole, more deeper and add organic matter, like compost or composted manure.  Water thoroughly to remove air pockets and wait a few weeks to see them bounce back.

In a week or two, this Heuchera will bounce back, doubling in size. Richer colour and a more robust habit will allow you to enjoy the plant for many years to come.

In my experience, other plants like Tiarellas and Heucherellas don't heave. But, I can't part with having Heucheras. They brighten and colour the garden like very few shade loving plants. They are the most disease and bug resistant of perennials. They may be a bit more work to take care of, yet totally worth it.

Dead-heading Flowering Bulbs After Blooms Fade

$
0
0
I can't say enough about dead-heading bulbs after their flowers have faded.

Depicted below, are tulips that have lasted for years, simply because energy has been able to get back to the bulb below.


It can be tricky, but timing is key. Here, several varieties of tulips (the reds and whites have been around for over 5 years), all flowering at different stages. Get in there, as soon as you see petals falling off and remove those seed pods.


Once petals begin to fade in colour and begin falling off, the plant has already developed a large seed pod.


If you haven't got a pair of pruners handy, at least snapping them off at their base is good enough. I prefer to take the seed head with the stem - cutting back to the base where the stem originates.


With daffodils, hyacinths and other bulbs, the flower petals don't fall off, they just fade and go brown. They each have a bulbous base where seeds are developing. Again, if no pruners are handy, just use your thumb and nip off below the bulge.


It's amazing how much tissue and energy is produced when developing seeds, even before all the petals brown. All that energy needs to go back into the bulb for next year's bloom.

If you're interested in growing bulbs from seed, well...keep them until the seed head browns and dries on the stem.


Stylophorum diphyllum AKA Wood Poppy

$
0
0
This past February, I was privileged to attend a pollinating seminar and native plant talk at the TBG.


Lorraine Johnson (notable author on Native Plants in Ontario) was one of the speakers at the seminar I attended and in her slideshow presentation, she had this plant depicted. I had come across this plant more than once before but knew very little about it. As soon as I saw the photo, I said "Yes!" out loud - delighted to get confirmation to my approach in keeping this "weed" in the garden.

Thankfully, I didn't yank them out last year. Ffffeeew! Lorraine spoke of Wood Poppies as being one of the first flowers in spring which native pollinators need to feed on. I've noticed many solitary bees feeding regularly.

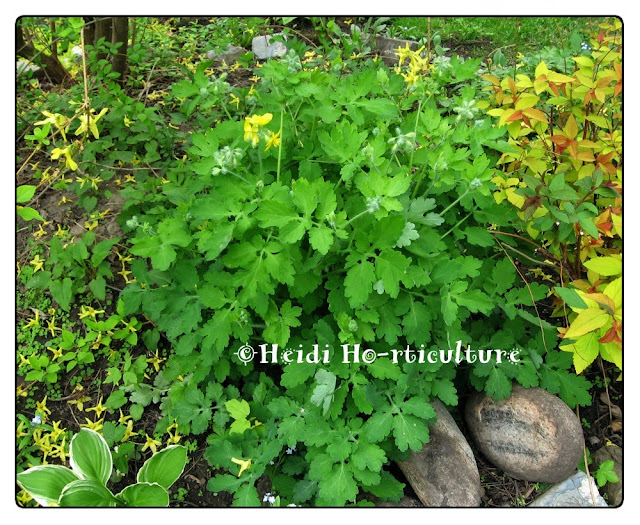
Wood Poppies are a native perennial to southern Ontario, Canada.  Growing incredibly fast and full. In this spot, they have been flowering since the 1st week of May.


I was so pleased we didn't yank them out. They were much smaller and had one flower last year. Where they came from?...still is a mystery. Nonetheless, I am happy to situate them in the shaded part of the garden where they seem to thrive.


Wood Poppies are also known as Celandine Poppies. Flowering for some time now, their buds are just as beautiful as their flower. Hence, the name Poppy - those fuzzy buds are quite sweet.

So grateful to have this addition to the garden. Giving myself a pat on the back and thanking the heavens for dropping them in the garden for us to enjoy!

Having looked up more info at the Canadian Wildlife Federation site, I see they were listed as an endangered plant in 2000.  Here's hoping more will seed and propagate.

The Imposture: Chelidonium majus

$
0
0
I love social media for this alone: In my previous post of Native Wood Poppy, I got a heads up that I have an imposture, not the true Stylophorum diphyllum in the garden.

Slightly bummed, but now grateful to know the difference - I have it's Eurasian cousin: Chelidonium majus.

Oh, well. The bees don't seem to mind. I may lift out more of the seedlings I was going to nurture.


I've been told the Native Wood Poppy has larger flowers (this one is about the size of a twoonie).


The dead give-away, are it's seed pods. Stylophorum diphyllum have seed pods that droop and look similar to the flowering buds. Here, the Chelidonium majus have long bean pods that point upwards.

Thanks, Shawn! I appreciate the learning curve!

The good aspect: I can now dead head these seed pods to prevent them from seeding all over!

Coffee Grounds In Compost

$
0
0
I've been composting coffee grounds for a long time.


It takes me about 3 weeks to accumulate this much:


I'm sure there will be research indicating it's not the best thing to add to our gardens. Yet, I have not experienced anything other than rewards using it.

I use a Bodum/French Press and enjoy not impacting the heaps of waste when it comes to the recent use of coffee toss away pods. In my dual batch rolling composter, I get great compost after 6 weeks in the summer. Having a sniff of the finished compost, there's no trace of the coffee aroma left. My plants seem not to mind at all!

What I can't understand is why I've only seen one program which uses coffee grounds from big coffee shop chains.

I happened upon Grounds To Gardens at Cloverdale Mall this past April. Stopping to see bags of compost mixed with coffee grounds available for sale. My first reaction: "It's about time!" Oddly enough, I can't seem to find it available since.

Can't see why?  Know of any?


DIY Bird Bath For the Garden

$
0
0
I have a tiny backyard, yet it's quite surprising how many birds frequent my little oasis.

I bought this tiny fountain and found a small sparrow bathing on the edge in the heat last week. This prompted me to do something.


Finding this great flower pot holder, I thought they would serve as great holders for a bird bath.


I went to the local Good Will and bought this pie plate for next to nothing.


I looked for more decorative plates, but I didn't know if the glaze on some cheaper dish-ware would be ok for the birds (possible chemicals) or tough enough to leave outside. So I kept to glass.  It's deep enough for a bird splash, not too heavy for the holder. Better to recycle and reuse something this easy to find. Placing it up high, if it breaks, ah...it's only a pie plate.

Ideal for a fence, I placed the holder this high:


Birds need good footing and a safe place to bathe. I bought flat stones from the dollar store, washed them and arranged enough to cover the bottom. They are ideal. Heavy enough not to spill out and smooth enough to keep easily clean.


The pie plate offers a ledge where the birds can wiggle dry and where I attached the bath there's ample get away space from any cat. High up for added protection.

Affordable and easy to install.

Level with the fence top, birds can easily hop in.


The sound of my little fountain attracts the birds and thus, I have made my little backyard an oasis for  my feathered friends as well.

One other aspect, if you get tired of keeping it as a bird bath, it can be a great feeding station instead.

Aphids on Thalictrum rochebrunianum Meadow Rue

$
0
0
Talk about aphid colonies taking over:


A week ago, flower buds were just hovering over this Meadow Rue. Today, I noticed one side of the plant had flower stalks shorter than the other.


On closer inspection, the stems were thicker and bits were moving. Aphids by the thousands were feeding on this poor stalk. Suppressing and dwarfing the flower head.


Aphids drip honeydew excrement, which leaves behind white/sticky coating on leaves below.


I refuse to use chemical controls for aphids. A heavy spray from a hose end attachment...


...usually does the trick and unfortunately, the colony was way too thick. I would waste too much water if used alone.


As I sprayed, I squished nearly all the soaked stems by hand. Yes, gross, but easy enough. Very cathartic to rid them in this way.


All clean.  Easily said than done. I will have to keep my eyes on these stems. Colonies can easily regroup and multiply.


Hopefully, the left side will now have enough energy and sap flow to regain what was lost from the aphids feeding.

The likely cause: very dry May weather. This site is usually quite damp and moist. Little rain and no irrigation have made aphids attracted to this succulent feast.

Amsonia "Blue Ice" Blue Star - The Virtual Unknown

$
0
0
I am partial to blue in the garden. I keep Forget Me Nots just so I can enjoy a lengthy blue bloom in my backyard. It's a sacrifice, I know ;)

Once Myosotis fade, there's not much else that flowers blue in June.

Except this gem:


Amsonia is truly a gift to the gardener. No pests, no staking required, lovely as a cut flower....the attributes will astound you. Good for dry shade as well.


Soft blue, delicate trumpets.  Between my Brunneras and Amsonia, I am happy.


One of the best features as well, is autumn colour.

Frost tolerant and quite late to change colour. Hues range from butter yellow to light orange.


Black Scale on Purple Leaf Sandcherry (Prunus x cistena)

$
0
0
I see shrubs in rough shape all the time.

From afar, this Purple Leaf Sand Cherry didn't have the usual deep purple leaves for this time of year. It was a dead giveaway of something wrong.  Up close, I was in shock.


Sticky, bumpy and mouldy stems point to a major problem.


Black invaders were sucking sap on EVERY stem.


The worst on newer growth.


Then seeing scale nymphs all at the base too!  These young, grey coloured, softer scale insects have emerged from underneath old brown female scale insects, and were making their way up the main branch to the tender stems to feed. This could be Lecanium Scale, but I am not 100% certain.


Here, you can see both sizes and life cycles. I am not sure if they have females which can reproduce parthenogenetically (without mating), but boy oh boy - there were thousands.

The females usually lay eggs in spring and the crawlers hatch from May to June in most species of Scale insects. Now, they molt and turn into instar (smaller juveniles) before becoming large adults. They feed by sucking sap and excrete sooty mould which covers all the branches and stems below. It's quite the mess maker at this stage.


Here, I removed some large black females and you can see some nymphs coming from her underside.


HOW TO CONTROL

I made a tough decision:


I coppiced the entire shrub down to nubs. The situation called for heavy pruning anyway. Coppicing can force new growth right from the blunt cuts. Perhaps not the best time. But to leave it in the state that it was in, was too difficult to manage.

A treatment of dormant oil before buds began to swell in March would of been ideal. It was too late.

Cutting away and removing from the location was the only way I could control such heavy populations of scale.

One small stem remained. In a few weeks time, many more will emerge again.

Plant Profile: Rubus odoratus - Flowering Raspberry

$
0
0
Choices for mass plantings can be daunting. However, if you need drought tolerant, disease resistant, full and easy to maintain shrubs; choose Rubus odoratus.


 Having learned about this plant in school, I had my doubts.


It had been given a bad rap for being aggressive in my learning years.


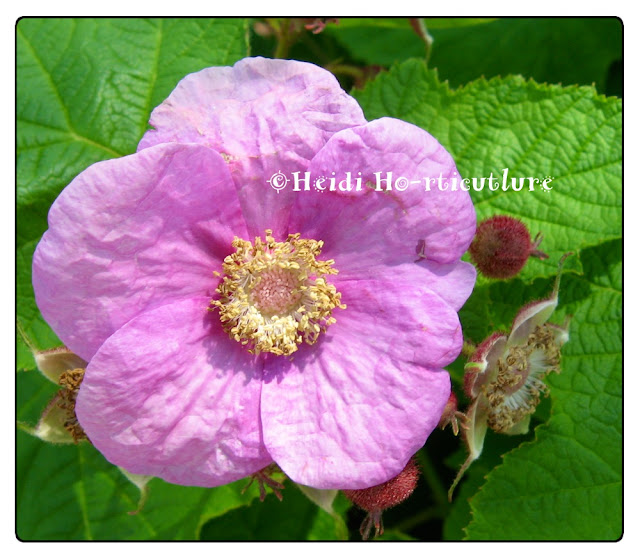
However, in the right spot - it shines. Large pink flowers which fade in coloration as they unfurl. Fuzzy flower buds which look so interesting, cover the entire plant. This shrub flowers from mid June to August. Their fruit are considered to be edible, but not palatable as its raspberry cousins.


Thornless stems and palmated, maple like leaves are tough as nails. Never have disease and cover large areas - keeping weeds at bay.

The plant is so versatile in various light conditions. I have had good success with both full shade and full sunny locations.

One trick. DO NOT prune back hard in the spring. Wait until the plant responds by showing bud break and growth in late spring. Only cut out dead wood. Do not shape or do not manipulate. Leave it be.

If you prune it back too hard it will begin to naturalize and run.

Here you can see a baby plant emerging close by:


This came from a running root. In this case, I left it to fill in a gap.  Like other rubus plants, they have running roots that can spread. If it does spread, it's easy enough to remove and control in spring.

Bees love their simple, open flowers.

I am convinced now of its benefits. Great choice in a sprawling area which needs coverage.

Viburnum Beetle - Pyrrhalta viburni

$
0
0
Ok, this has to be the worst sight to a gardener:


Nothing breaks your heart more than coming across this sort of devastation too late in the season.


The Viburnum Leaf Beetle. There's only a handful of Viburnums this beetle doesn't eat (link here).  Unfortunately, when I first had a look at this Arrowood Viburnum in early June, it was too late. 3 weeks ago, I gave it a major prune anyway.


I had to cut the shrub down hard as a preventative. Had I done this in early April, I could of averted this ugly scene below:


Brand new, succulent growth that the adults are now feeding upon. However, the bulk of stem growth that is left has been drastically reduced, which in turn will reduce egg laying sites after mating.

A relative new-comer to North America, (originates from Europe and Asia) these leaf eating beetles are by far the most frustrating.


The adults poke and lay their eggs in the tender, new growth shoots. Here are the exit holes from the previous year's growth. 


Here, you can see the egg laying holes are above a bud (node) which shows last year's growth from the previous year's growth.

When the eggs are laid, there are abrasions on the stems that are not as noticeable as these. Sometimes, the tissue around the pierced holes go grey and discoloured instead of the normal brown healthy colour.


This time of the year, the adults feed voraciously and mate. Soon to lay eggs and pierce holes in the tender stems, starting the process all over again. 

I removed as many adults by hand and squished them. Yuck. It is easier to remove the adults rather than the larvae.


Life Cycle and Treatment: It's hard to believe this little beetle could be so damaging.

In early May, eggs hatch and larvae push through their winter home and devour new leaves emerging.  They feed on the undersides of the leaves. Going unnoticed until the damage is done. In June, they crawl down to the base and sometimes fall to the ground to pupate. I've read: cleaning up fallen debris and leaves help to remove pupating sites and reduce their chance to become adults. But, I still saw adults emerging from below after doing so.

Now that I have removed as many adults as I could see, I will keep my eye on the remaining foliage to see if I see more of the lace pattern on the leaves from their feeding sites.

In October, when the leaves drop, I will reexamine the stems for egg laying sites and cut away more growth to prevent the eggs from hatching next spring.

You can use dormant oil treatments before bud-break in spring, but it will only marginally reduce larvae numbers and not kill them all off entirely.

One note: you can use some contact sprays during the larvae stage, but sooooo many beneficial insects feed off the larvae. Direct spray contact will kill them too.

Pruning and a watchful eye will save what's left, better than any chemical.

Planter Risers

$
0
0
One of the biggest struggles I have in a shaded garden is proper drainage for my planters.

This past June, we had immense rainfall in the GTA. 165mm worth. I never had to water my planters last month. They have holes at the bottom, but sometimes the gap between the ground and the pot doesn't allow for adequate drainage.


In the planter above, I lost one annual from rotting, even though there are 8 drainage holes.

Raising planters and pots off the ground also keep the pots from harbouring slugs and pill bugs. At night, they crawl out from beneath perfect hiding spots and devour foliage.

Having looked online for potted planter "feet", I was shocked on how much they were asking. I tried to find cheaper alternatives.

Below you can see, I used small interlocking stones beneath my larger planters and when the pot is removed, there hid the culprits. This method wasn't working.


Today, I was in my local hardware store, walking down the plumbing isle, when out of the corner of my eye, I spotted these:


Perfect!

Don't ask me what they are for. Just some PVC plumbing rings. $17.85 & 28 pieces later, I bought enough for my needs.


One on each corner and within 1 minute of placing them, water flowed through.


For square/rectangular pots, I used one on each corner and for the round, 3; spaced equally.


The PVC ring won't be a sheltered pedestal for these pill bugs or slugs anymore.


My plants have suffered enough.


Bring on the rain. I don't need to worry anymore.

I Eat Weeds

$
0
0
Ok, two years ago, the only weed I would dare to eat were Dandelion leaves - that was pretty much it. Today, I enjoy eating several and the term "weed" has a whole new meaning.

I have a job because of weeds. When you truly examine plant life, you realize: weeds are just unwanted vegetation. But not all weeds are unwelcome.

The recent welcomed additions to my diet are:

1.
Lambs Quarters

Lambs Quarters (Chenopodium album) is common in nearly all disturbed soil sites, in perennial borders, park land and growing in areas where turf is situated. It's a heavy seeder and will self seed virtually everywhere.

I only eat these when they are young plants. I prefer the tender new leaves.

Note: I've read you should be careful with large quantities of Lambs Quarters when eaten fresh. The plant has Oxalic Acid, but the acid is eliminated in cooking.  Adding a handful to salads as a fresh, crisp crunch and mild flavour. Similar tasting to Swiss Chard and Beet Leaves.

You'll find tender, newer plants in May and June. Although, new plants are also found all throughout the growing season- if you keep your eyes open and can recognize the difference.

Notable identifying flower buds. Silver underside leaves, with silvery flower buds. When it has gone to flower, this indicates tougher leaves.
Also known as Wild Spinach, it is loaded in Vitamin A and C.

2.
Purslane

The second - Purslane (Portulaca oleracea)


Growing under my cedar bush, I only take a stem or two at a time. The mature, fleshy stems have the best leaves. They are quite juicy, when picked fresh.

If you are foraging, take as much of the root as possible when picking. This helps with storing and lessens wilting.

It shows up later in the season, usually by mid July. Found in nearly every growing situation.

I came to know this weed as food, when several years ago my crew and I were removing a heavy cropping of Purslane in one of our annual beds. A lady approached us and eagerly asked if she could take a bag full of our weeds.  I stopped to watch her diligently remove purslane from other weeds and gingerly put them in her bag.  I couldn't help but ask her what she did with them. English was her second language, and from what I could understand she made: 1) tea with it, 2) ate it in salads and soups and 3) used it in stir-fries.


Googling its uses, I was very surprised on its health benefits and how many Asian and Mediterranean meals have it in their recipes. Highly nutritious, it too is loaded with Vitamin A and C.

Last year I transplanted a few plants into two of my containers and added the leaves to my salads. Now I find some pop up in my front yard. I leave some stems and tip growth to full maturity, as they generate flowers and seeds at their tip. This ensures they return next year.

The leaves have a slight tangy-ness to them and a great crunch. Lots of work to de-leaf them from their stem, but I got the hang of it.

The great thing about Purslane, it is edible up until frost. It doesn't get overly woody and unpalatable when the plant ages. It regrows quickly, is drought tolerant and loves the heat of summer. Leaves are also rich in Omega-3 Fatty Acids.

Here is one salad recipe:


Wash the Purslane thoroughly. It grows right along the soil surface. Lots of grit usually comes with foraging it.


You can eat the stems, but I enjoy the leaves more. I remove each leaf; by holding on to the tip of the stem and running my index finger and thumb over the leaves, pulling the leaves off the stem as I go down. Watch for leaf-miners feeding inside the tissue of the leaves - discard. They love Purslane too.


I generally add 1-2 tablespoons full in each salad I make.

Recipe:

Green beans
Celery
Cucumber
Cherry Tomatoes
Garlic Chives
Swiss Chard
Fresh Oregano Leaves
2 tbsp Purslane Leaves
2 tbsp Apple Cider Vinegar
1/2 an Avocado
Salt & Pepper to taste
splash of Olive Oil
1/2 tsp of dried Oregano flakes
1 tbsp of Black Olive tapenade
1/2 tsp of Dijon Mustard

Yum, Yum, Yum!
Next time you see it growing in between the cracks of the sidewalk or in your own garden, think twice about composting it!

What's wrong with my Hosta?

$
0
0
I have several hostas in which I acquired through purchasing my home. I decided to leave them, as they were all a lovely size and situated just right.

However, at this time of year, they do this:


Half of the leaves flop in the wind and become unsightly. Losing the great habit that Hostas are known for.


If you already haven't noticed, they are riddled with holes.


Not only are the leaves damaged but the stems.


The leaf stems are weakened from slugs feeding voraciously.


The stems become weak and with the wind, the leaves bend with no strength and make the Hosta look unsightly.

Nearly, at the base of each leave stem, you find a tiny slug. This one made it into my pail of salt water this morning.

I have used: slug bait, beer baits, hair, coffee grounds...you name it. Now resorting to early morning hand picking.

Thankfully, my other slug resistant Hostas are thriving and show no signs of this damage.


If this had occurred before mid July, I would have cut the Hosta back to the ground and let it re-foliate. But given it's mid August, I will remove the worst of the leaves and continue the battle against slugs. :(

Moral of the story:  buy slug resistant Hostas!
Viewing all 215 articles
Browse latest View live